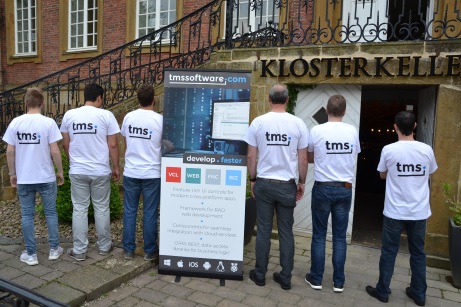
 A local school in the town where the TMS office is located organized last week for the kids a project where they could experience an entire day in a working place they dream of for their future career.
We had the pleasure to welcome Obama in our office. Obama is an 11-year-old boy who would love to become a software developer. We at TMS Software offered him the opportunity to follow us for a day and see what it takes to be a software developer. To inspire Obama and raise the interest of the next generation, we wanted to show Obama what a great variety of platforms we could tackle with our beloved tool Delphi and our frameworks. And what better way to captivate the youth then to create a game?
We choose the code-breaking game Mastermind that was invented in 1970 by Mordecai Meirowitz.
For those who dont know the game, the purpose is to guess the code created by your opponent, or in this case the computer, by using four colored pegs. There are six colors to choose from and after each guess the opponent gives feedback on how many colors are correct and how many colored pegs are in the right position. In our game we decided that the red mark would indicate that the peg was in the correct place and a white mark if the color was used in the code, but not on the position youve guessed. To make it a little easier, weve also made sure that the colors are only used once and no empty spots are in the pattern.
If you already want to play our game before we explain how everything works, you can do this at www.tmssoftware.com/MasterMind.
As we wanted to show the power of our components and use it on almost every platform on the planet, it was a logical choice to work with our FNC components. This way we can use the same codebase to create a VCL, FMX and web application. A progressive web application to be precise. The advantages for a PWA application are clear:
- The application has a responsive design, this means that it adapts automatically to the device screen so it looks good on mobile and desktop.
- It is aware of
- You can install the application on mobile devices and Chrome OS, without going to a censored application store.
- It looks like a native application running full-screen with access to the hardware.
The only remark here is that it should initially be accessed via HTTPS. As you can see on both pictures below an example where you can see the web application on the left and then the downloaded app on the right which is launched as installed app and is running full-screen and offline.


So, a TMS web progressive web application is the best way to let Obama show what he built to all of his friends and family. It is as easy as sharing the link to play the game in an internet browser and you can also download and install it on your phone or tablet to have it available even when you are offline or want to save some mobile data.
To put the icing on the cake, we didnt just create the game as progressive web application. This served also as a proof of concept to create a TMS Electron project created in Delphi from the same source code! This technology is in development in our lab and this will be part of the TMS WEB Core 1.2 Padua release. It allowed us to have an out-of-the-box working and installable desktop application for Windows, macOS (macOS 64-bit app to be precise), and on Linux in a matter of minutes. Here are some screenshots of this cross platform TMS Electron desktop application on Windows, macOS and Ubuntu. As we guess that many of you are eager to work with this awesome technology, we are working hard to make a TMS WEB Core 1.2 Padua Beta release available as soon as possible to our TMS ALL-ACCESS users.


Now to get to the programming. We started with the idea to create a control for one entry containing the four colored pins, a check button and the four markers that evaluate your guess.
A quick look in the wide range of FNC UI components weve already available, taught us that the TTMSFNCBitmapSelector looks the most similar component to what we want to create. So we took the custom FNC component this TTMSFNCBitmapSelector was derived from and started with the TTMSFNCDefaultSelector. This would be the basis for our FNC UI component TTMSFNCMasterMindControl. We built the board by creating 12 of our UI controls and placed them underneath each other with the use of top align.
It took us no effort to evenly space everything horizontally or to scale everything when the window is resized, as this is already done in the class TTMSFNCDefaultSelector. We just had to draw our images and the first line was already visible on our screen.

To get a little more in detail. Weve created one row with five columns, where we use images to draw the four pegs with one TTMSFNCBitmapContainer, which contains the images for all the colors. The public property DataInteger that exists for every TTMSFNCCustomSelectorItem in the TTMSFNCDefaultSelector is used to hold the value of the selected color. The Check is just text shown in the item and the four check markers are drawn via TTMSFNCGraphics, where we just calculate the optimal size to draw four circles and fill the color of the ellipsis according to the number of correct pegs.
Then we checked how the interaction with mouse, keyboard and touch could be realized to ensure the game can be played on a variety of devices. With mouse or touch, consecutive clicks on each of the 4 positions cycles through the colors. Weve added navigation between positions with the left and right arrow keys and cycling through color per position with arrow up and down. This UI behavior was again fairly easy to implement due to the fact that most of the behavior was already in the superclass.
We use the left and right arrow keys to navigate within our own control and as you can see below, you have the prove that this is very simple as the GetPreviousSelectableItem and GetNextSelectableItem are both functions from the TTMSFNCCustomSelector.
procedure TTMSFNCMasterMindControl.HandleKeyDown(var Key: Word;
Shift: TShiftState);
var
dataInt: NativeInt;
begin
case Key of
KEY_LEFT: SelectedItemIndex := GetPreviousSelectableItem;
KEY_RIGHT: SelectedItemIndex := GetNextSelectableItem;
KEY_UP:
begin
if (SelectedItemIndex >= 0) and (Items.Items[SelectedItemIndex].DataString = 'image') then
begin
dataInt := 1 + Items[SelectedItemIndex].DataInteger;
if (dataInt > 6)then
dataInt := 1;
Items[SelectedItemIndex].DataInteger := dataInt;
Invalidate;
end;
end;
.
end;
The code to change the peg color from the mouse up handler override is:
procedure TTMSFNCMasterMindControl.HandleMouseUp(Button: TTMSFNCMouseButton;
  Shift: TShiftState; X, Y: Single);
var
  dataInt: NativeInt;
begin
  if Enabled then
  begin
    inherited;
    if (SelectedItemIndex >= 0) and (Items.Items[SelectedItemIndex].DataString = 'image') then
    begin
      dataInt := 1 + Items[SelectedItemIndex].DataInteger;
      if (dataInt > 6)then
        dataInt := 1;
      Items[SelectedItemIndex].DataInteger := dataInt;
      Invalidate;
  end;
end;
We use the up and down keys to change the public DataInteger property of the selected item of type TTMSFNCCustomSelectorItem which changes the bitmap image of the selected peg in our DrawItemContent function.
The code is:
procedure TTMSFNCMasterMindControl.DrawItemContent(AGraphics: TTMSFNCGraphics;
  ADisplayItem: TTMSFNCCustomSelectorDisplayItem);
var
  di: TTMSFNCCustomSelectorItem;
  idx: Integer;
  bmp: TTMSFNCBitmap;
  pt1: TPointF;
  checkPinsRect: TRectF;
  side: Single;
  i: Integer;
  tempPCorrect: Integer;
  tempCCorrect: Integer;
  w, h: Single;
  s: string;
begin
  inherited;
  di := ADisplayItem.Item;
  // draw the peg using a bitmapcontainer image
  if Assigned(di) and (di.DataString = 'image') then
  begin
    idx := di.DataInteger;
    AGraphics.BitmapContainer := BitmapContainer;
      case idx of
        1: s := 'red';
        2: s := 'blue';
        3: s := 'yellow';
        4: s := 'orange';
        5: s := 'green';
        6: s := 'purple';
        else s := 'empty';
      end;
    AGraphics.DrawBitmapWithName(ADisplayItem.Rect, s);
  end;
  // draw the score
  if Assigned(di) and (di.DataString = 'check') then
  begin
    w := ADisplayItem.Rect.Right - ADisplayItem.Rect.Left;
    h := ADisplayItem.Rect.Bottom - ADisplayItem.Rect.Top;
     if(w < h) then
       side := w / 2
     else
       side := h / 2;
     tempPCorrect := FPosCorrect;
     tempCCorrect := FColorCorrect;
     // retrieve scores
     for i := 0 to 3 do
     begin
       if(tempPCorrect > 0) then
       begin
         FTColors[i]:= gcRed;
         Dec(tempPCorrect);
       end
       else if (tempCCorrect > 0) then
       begin
         FTColors[i] := gcWhite;
         Dec(tempCCorrect);
       end
       else
         FTColors[i] := gcNull;
     end;
     // Mastermind row is active, so use active color
     if (Enabled = true) or (FPosCorrect = 4) then
     begin
       AGraphics.Fill.Color := activeColor;
       AGraphics.Stroke.Color := activeColor;
     end
     else
     begin
       AGraphics.Fill.Color := boardcolor;
       AGraphics.Stroke.Color := boardcolor;
     end;
     // draw 4 score circles in correct score color
     AGraphics.DrawRectangle(ADisplayItem.Rect);
     AGraphics.Stroke.Color := gcBlack;
     checkPinsRect := RectF(ADisplayItem.Rect.Left + 2, ADisplayItem.Rect.Top + 2, ADisplayItem.Rect.Left + side - 2, ADisplayItem.Rect.Top + side - 2);
     AGraphics.Fill.Color := FTColors[0];
     AGraphics.DrawEllipse(checkPinsRect);
     checkPinsRect := RectF(ADisplayItem.Rect.Left + 2, ADisplayItem.Rect.Top + side + 2, ADisplayItem.Rect.Left + side - 2, ADisplayItem.Rect.Top + (side * 2) - 2);
     AGraphics.Fill.Color := FTColors[1];
     AGraphics.DrawEllipse(checkPinsRect);
     checkPinsRect := RectF(ADisplayItem.Rect.Left + side + 2, ADisplayItem.Rect.Top + 2,  ADisplayItem.Rect.Left + (side*2) - 2, ADisplayItem.Rect.Top + side - 2);
     AGraphics.Fill.Color := FTColors[2];
     AGraphics.DrawEllipse(checkPinsRect);
     checkPinsRect := RectF(ADisplayItem.Rect.Left + side + 2, ADisplayItem.Rect.Top + side + 2, ADisplayItem.Rect.Left + (side*2) - 2, ADisplayItem.Rect.Top + (side * 2) - 2);
     AGraphics.Fill.Color := FTColors[3];
     AGraphics.DrawEllipse(checkPinsRect);
  end;
end;
As a last part we just had to implement some code to check the pattern and return an event if we did a guess. We then disable the FNC UI control for the active row on the board and enable the next row so we can move to the next step.
And thats all for the component used in the game. Now we just have to create the form of the progressive web and Electron application and everyone can play the game anywhere, anytime.
Just to show the power and the time we gained by using one of our custom FNC components, weve also created a VCL and FireMonkey application with the same code.

To conclude, Obama was very proud of the game he helped creating and named oBama mind and he showed it to all of his classmates. We hope that this way, he could transmit the passion for software development to his classmates and inspire a future generation of Delphi developers. To
illustrate the scope of this type of development with TMS WEB Core, Obama even showed it to his friends on his PlayStation 4, where you can play it on the built-in web browser. He said that now he is even more certain he wants to become a software developer!
We are one step closer to a future where Pascal programming is guaranteed.
The full source code for the Mastermind game that you can compile as VCL, FMX or Web core application is available for download.
As soon as TMS WEB Core v1.2 Padua will be released, you will also be able to compile it as an Electron Windows, macOS or Linux desktop application.
↧
Igniting the passion for Delphi for future generations
↧
Happy Birthday Delphi!

Time flies as today we already celebrate the 24th birthday of Delphi. The past 24 years have been an amazing, adventurous and always exciting voyage!
Looking back at 1995, Delphi was nothing short of a dramatic breakthrough in productivity for software development.

Before, I still remember that creating a Windows application created with Turbo Pascal for Windows also required having the Resource Workshop tool ready. We'd typically create dialogs and other resources via the Resource Workshop. And then came the tedious process of linking the UI control logic to the elements on the dialog via IDs. One mismatching ID and the dialog would be broken. Other than this, we merely had to use the Windows API to achieve even the smallest UI feature.
Then came Delphi. No more need for Resource Workshop. Direct usage of the Windows API could be dramatically decreased as Delphi introduced the integrated form designer and more importantly the UI control model mapping on existing Windows controls but also open to extend and create custom controls, seamless binding to a database and even live design-time data. In a nutshell, us, Pascal developers could create Windows applications 10 times faster with 10 times more features.
The next 24 years continued that quest for packing ever more programming productivity and reaching out to new targets. Soon Win32 support was added in Delphi 2. The world of web development opened with the inclusion of the breakthrough product IntraWeb from Atozed. Ever more out of the box support for all kinds of databases, multi-tier development and internet server development found a place in successive Delphi releases. It was waiting till 2009 for the breakthrough to add Unicode support and 2011 to bring the power of Delphi to the 4 major operating systems: Windows, macOS, iOS and Android. We conveniently skip the short passages of bringing Delphi to Linux with Kylix and to the .NET framework world with Delphi 8 
In a fast moving and ever changing technology landscape, one could wonder why someone can have this passionate relationship with Delphi?
For a change, let's try to find an analogy with real estate instead of with cars :) The three most important things when looking for real estate are: "Location, Location, Location".
So, the three most important things for a Delphi developer are:
- Component model: abstracting technology and allowing to focus on business problems instead of technology
- Component model: allowing code reuse among developers in the team, across applications and across platforms
- Component model: providing an access to 3rd party code libraries in a consistent way
There are of course many more virtues to the Delphi language, IDE and ecosystem and things to be passionate about. Backwards compatibility is one such example and a natural, expressive non-cryptic language is another one. Very fast compile times to facilitate quick debug cycles. The list goes on. Let us know your most loved Delphi features!
In these 24 years, TMS software evolved along with Delphi also quite a bit. Where in 1995, it was just "me, myself and I" encapsulating code in components initialy mainly for reuse in my own consulting projects, TMS has grown into a unique and fantastic team I am truly proud of!
Nothing is more fun than brainstorming with like-minded enthusiast experts about how we could make the Delphi developers even more product or reach into new territories. With every new introduced technology in Delphi, we jumped on the wagon and created components for it. Yes, back in the days, we even had our grid working in Kylix and also for Delphi for .NET
. More succesful projects were the creation of a suite of UI controls for IntraWeb, the first FireMonkey components on the market for cross platform development, the leading Delphi ORM Aurelius, the REST server technology via XData, ... the list is endless. Last year we introduced a new framework for developing in a really RAD way from the Delphi IDE rich & modern web client applications using our beloved language with TMS WEB Core. This goes hand in hand with our FNC UI control developments enabling to use one set of UI controls not only in VCL, FMX, LCL applications but also for TMS WEB Core web applications. And for the backend of the web applications, this integrates nicely and smoothly with our TMS XData REST server technology.
But it is not all new technology all the time. We continue to take great care, enhance, extend, improve and polish very widely used flagship products like TMS Component Pack, our set of over 400 VCL UI components that saw its life back in 1998. Especially for the birthday of Delphi today, we released an update 9.0.4.0 with all latest improvements. Of course, active registered users get this update free, for users with an expired subscription we have discounts to renew and for new users we have this week a 20% discount! See our other blog post for details!
Have a great Delphi Birthday today!

↧
↧
TMS WEB Core v1.2 preview: New Electron application support
A few months ago we have started our experimental work with Electron. After the working proof of concept, our goal was to wrap as many Electron API for the Delphi developers as possible. But of course it's not just the Electron API that can be used, you can easily transfer your already existing code to make it a desktop application! We have already given a small teaser about this in a previous blog post.
Right now we would like to take the opportunity to give a bit more insight on the new upcoming TMS Web Electron Application support.
IDE integration
You are probably already familiar with creating a TMS Web Application or a progressive web application. The procedure is identical, and all you have to do to create a new Electron application is to select the TMS Web Electron Application from the wizard:

It generates a project similar to a TMS Web PWA Application, but instead of the manifest and serviceworker files, it has generated a main JavaScript file, a package file and 3 icons for the different platforms. Both the default generated package.json and main.js are capable of creating, running and packaging an application, but they can be further customized by editing them. The icon files can also be changed through the project options.

You can now develop your application like you would normally do with a TMS Web Application.
Upon pressing F9 in Debug mode, the project will compile as usual, then the Electron engine starts up and launches the application.
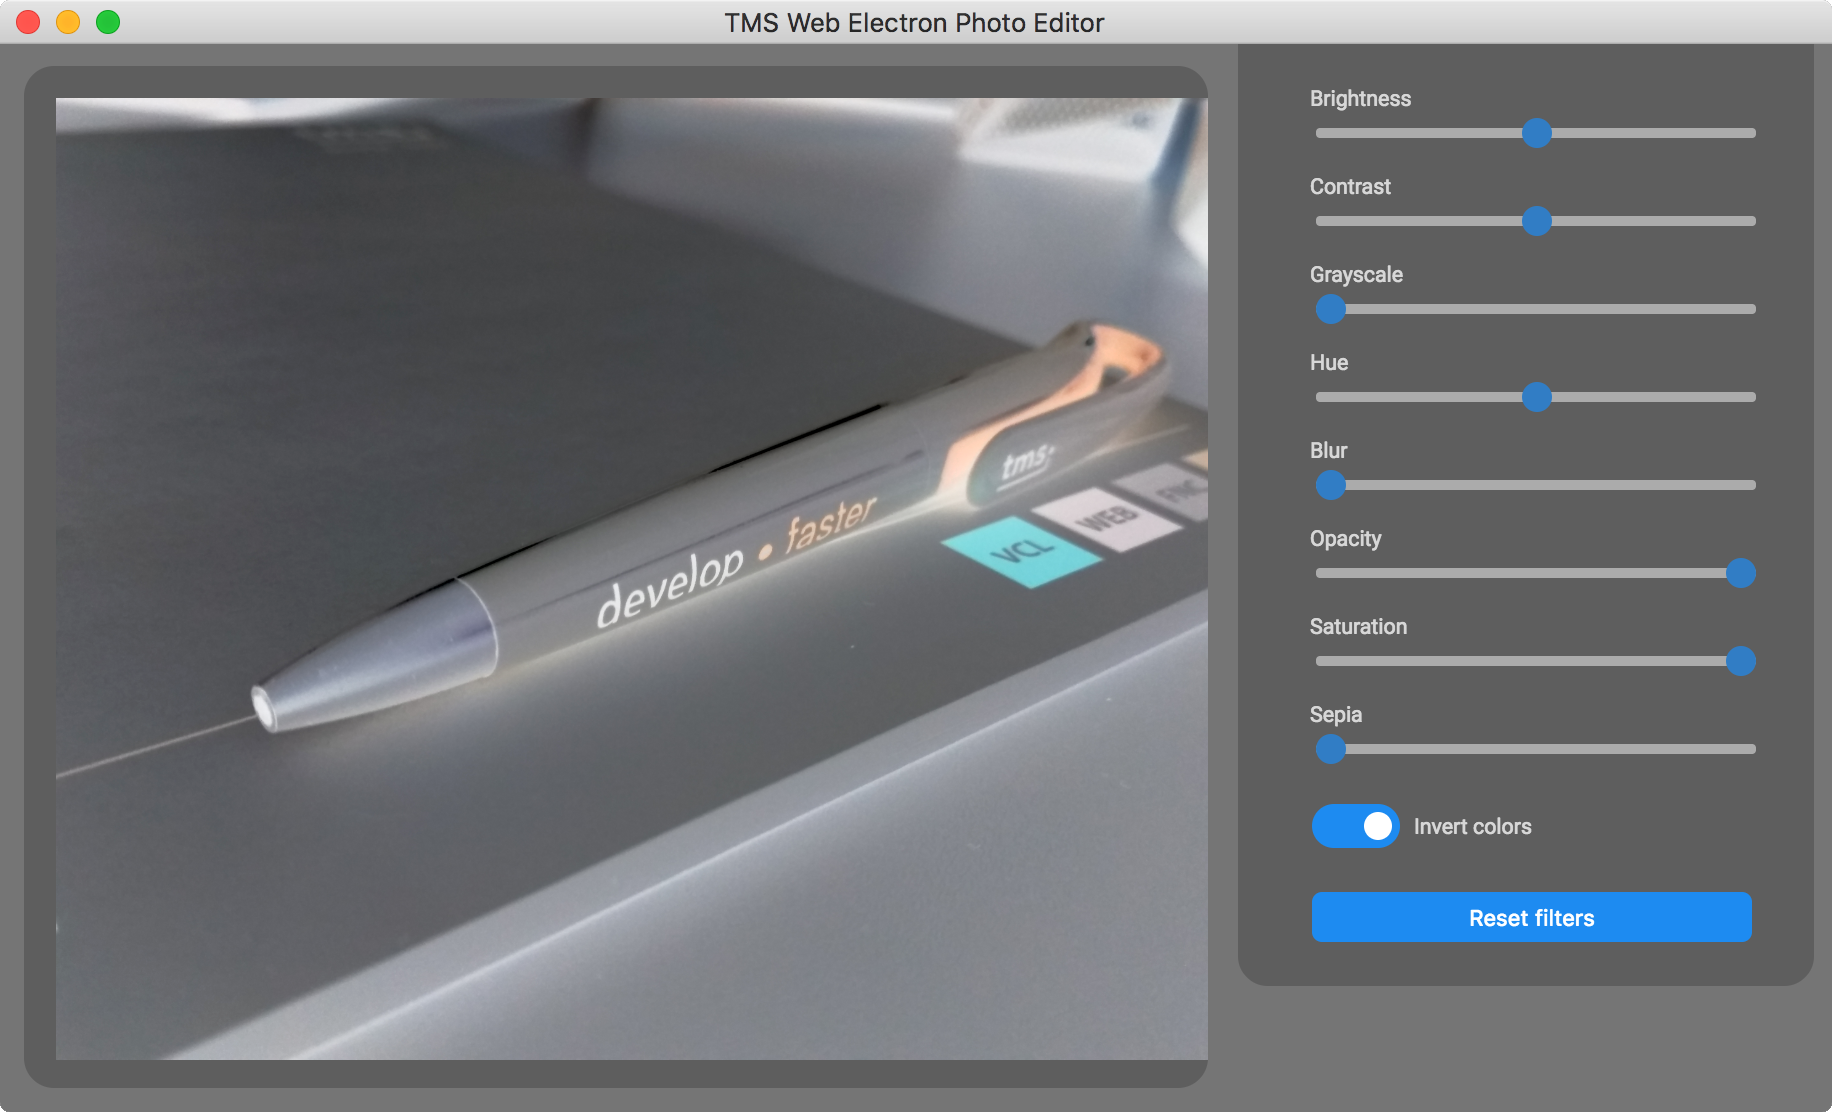
When it comes to Build mode, there are little differences and platform limitations. Pressing F9 in Windows 32/64-bit Build mode will package the application and launch it. Pressing F9 in Linux 32/64-bit Build mode will create the packaged application for Linux, which then can be moved onto a Linux machine and launched. While macOS 32/64-bit Build mode is added, unfortunately currently it's not possible to create a packaged macOS application from a Windows machine. But the good news is that a packaged macOS 64-bit application still can be made by copying the source files to a prepared Mac machine, and running a single command. Not to mention that if you would like to distribute a macOS application, then it's recommended to sign it, which can only be done on a Mac.
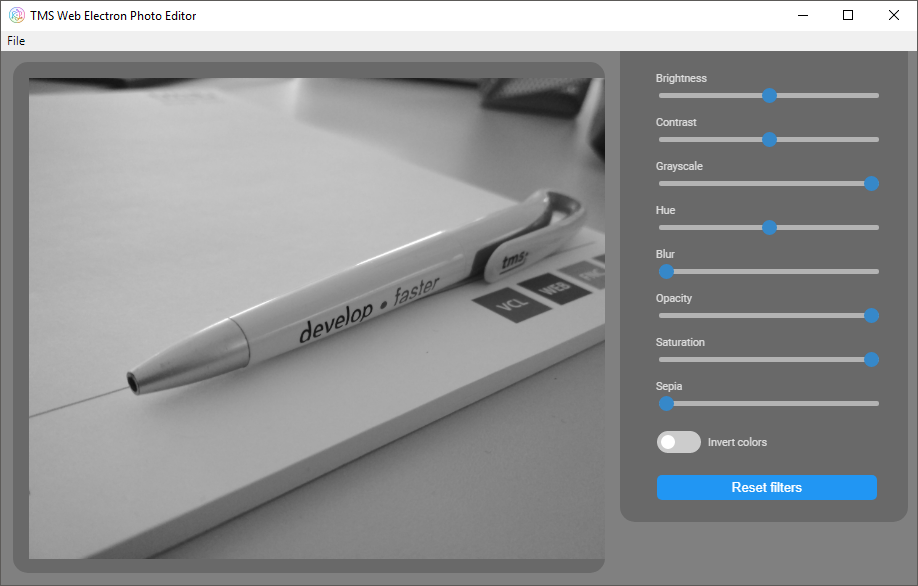
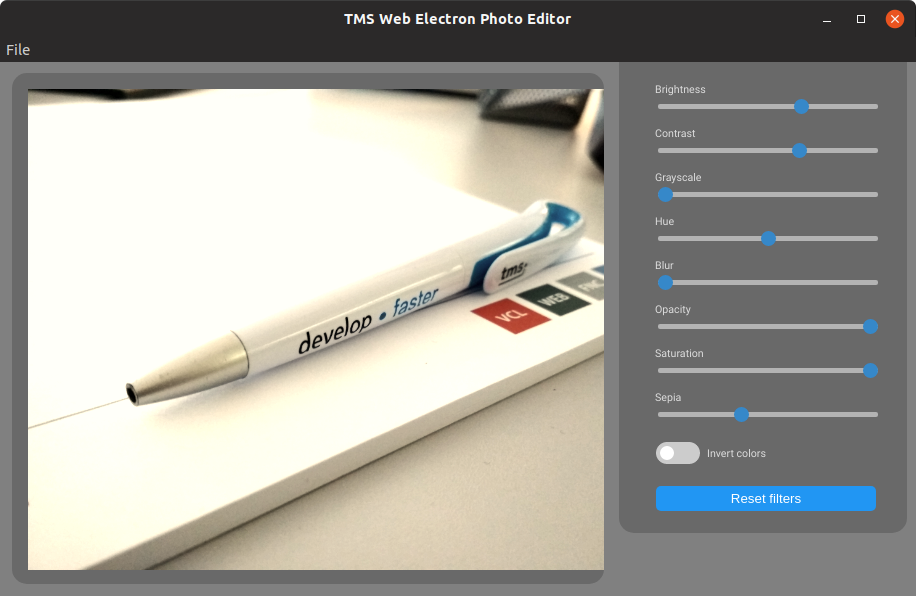
Creating a photo editor application
Electron provides a way for TMS Web Applications to create cross-platform (Windows/macOS/Linux) desktop applications and to use native operating system calls and directly access the local file system. So we would like to show the power of this by creating a basic photo editor application.
To keep this simple for now, we are only going to allow to apply filters on a selected photo through the CSS filter property, which is already an easier and faster approach than writing it for example in VCL since image filters like blur, contrast, gray-scale ... are not out of the box available in VCL . As a first step we add every component we will need in our photo editor.

Of course we cannot edit an image if we don't have an image. To tackle this problem, we are going to use TWebImageControl, TElectronMainMenu and TElectronOpenDialog. With TElectronMainMenu we can add a menu bar with menu items such as 'Open' or 'Save as...'. In the OnClick event of the Open menu item, we can then execute the TElectronOpenDialog and use the retrieved file name to load the image from the local file system.
procedure TForm1.Open1Click(Sender: TObject);
begin
  if ElectronOpenDialog1.Execute then
  begin
    WebImageControl1.Picture.LoadFromFile(ElectronOpenDialog1.FileName);
  end;
end;
With the image in place, we still need something on which we can apply the filter. Luckily, a TJSHTMLElement is just what we are looking for because it has a style property. Let's retrieve our TWebImageControl's TJSHTMLElement at form creation.procedure TForm1.WebFormCreate(Sender: TObject); begin FImgEl := TJSHTMLElement(document.getElementById(WebImageControl1.ElementID)); end;Now we have everything to apply the CSS filters. Instead of adding and removing filters as they change, a simpler solution is to store all the filters in their own string properties. When a filter trackbar changes, we update the given string property, and concatenate it with the rest of the filter strings. As a last step we apply this single filter string to our image.
procedure TForm1.BrightnessTBChange(Sender: TObject);
begin
  FBrightnessFilter := ' brightness(' + IntToStr(BrightnessTB.Position) + '%)';
  CreateFilter;
end;

procedure TForm1.CreateFilter;
begin
  FFilter := FBlurFilter + FBrightnessFilter + FContrastFilter + FGrayscaleFilter + FHueRotateFilter + FInvertFilter + FOpacityFilter + FSaturateFilter + FSepiaFilter;
  FImgEl.style.setProperty('filter', FFilter);
end;
With this approach, resetting the filters is also as easy as setting the single filter string to the basic values and resetting the trackbars into their original position.This was not complex so far, and our application is already almost complete, but the saving feature is still missing. For that, we are going to use TElectronSaveDialog, TElectronBinaryDataStream and TJSHTMLCanvasElement.
We can add a 'Save as...' menu item to our menu bar just as we did with the 'Open' menu item, then in the OnClick event we are going to write the logic to the image saving.
procedure TForm1.Save1Click(Sender: TObject);
begin
  if ElectronSaveDialog1.Execute then
  begin
    //save image
  end;
end;
By default if you are trying to save a picture that has a filter applied, it's going to save the original image without the filter. To make things worse, the generally accepted approach is not supported by every browser. Fortunately Chromium supports it, and it allows us to create our application without any drawbacks.There are 5 steps we need to take: retrieve our image as a TJSHTMLCanvasElement, create a new TJSHTMLCanvasElement for rendering, assign the filters to our new canvas's context, render the image, and save it to the file in the local file system. Assigning the filter will require some JavaScript, but as you'll see in the code below, it's an insignificant amount for a great result. To achieve the actual saving of the image, we are going to use TElectronBinaryDataStream. TElectronBinaryDataStream has a property called Base64, so all we have to do is assign the dataURL from our canvas to it, and then call the SaveToFile method. By now the code looks something like this:
procedure TForm1.Save1Click(Sender: TObject);
var
  canvas, el: TJSHTMLCanvasElement;
  ctx: TJSCanvasRenderingContext2D;
  bd: TElectronBinaryDataStream;
  w, h: Integer;
begin
  if ElectronSaveDialog1.Execute then
  begin
    //1: get image as TJSHTMLCanvasElement
    el := TJSHTMLCanvasElement(document.getElementById(WebImageControl1.ElementID));
    asm
      w = el.naturalWidth;
      h = el.naturalHeight;
    end;
    //2: create the canvas element
    canvas := TJSHTMLCanvasElement(document.createElement('canvas'));
    canvas.width := w;
    canvas.height := h;
    ctx := canvas.getContextAs2DContext('2d');
    asm
      ctx.fillStyle = "rgba(255, 255, 255, 0.0)"; //set a transparent background
      ctx.filter = el.style.filter; //3: add the filter
    end;
    ctx.fillRect(0, 0, w, h);
    //4: render our image
    ctx.drawImage(TJSObject(el), 0, 0, w, h);

    //5: save to file
    bd := TElectronBinaryDataStream.Create;
    bd.Base64 := canvas.toDataURL;
    bd.SaveToFile(ElectronSaveDialog1.FileName);
  end;
end;
Now if you take a look at what we have so far, sooner or later you will notice that the 'Save as...' menu item can be clicked even if no image is loaded to our application, which is not something we want. There's a quick fix for that by introducing a flag.After modifying our 'Save as...' menu item by setting it to be disabled by default, we can do the following to enable it after the first image has been opened:
procedure TForm1.WebFormCreate(Sender: TObject);
begin
  FImgEmpty := True;  //flag
  FImgEl := TJSHTMLElement(document.getElementById(WebImageControl1.ElementID));
end;

procedure TForm1.Open1Click(Sender: TObject);
begin
  if ElectronOpenDialog1.Execute then
  begin
    WebImageControl1.Picture.LoadFromFile(ElectronOpenDialog1.FileName);
    if FImgEmpty then
    begin
      Save1.Enabled := True;
      ElectronMainMenu1.EndUpdate;
      FImgEmpty := False;
    end;
  end;
end;
You might be wondering why the TElectronMainMenu.EndUpdate call is necessary. It's a shortcoming of Electron, where you cannot modify the menu dynamically. Each time the menu is modified, it needs to be reassigned to the window. To make this procedure less problematic to the Delphi developers, calling EndUpdate will recreate the menu bar and reassign it to the window.With this last small addition, we can say that we have created a basic and simple cross platform photo editor application that is capable of:
- opening a local file system image via a native open dialog
- applying filters using CSS
- and saving images to the local file system via a native save dialog.
And of course it's running on the 3 major operating systems: Windows, macOS and Linux using a single source code-base!
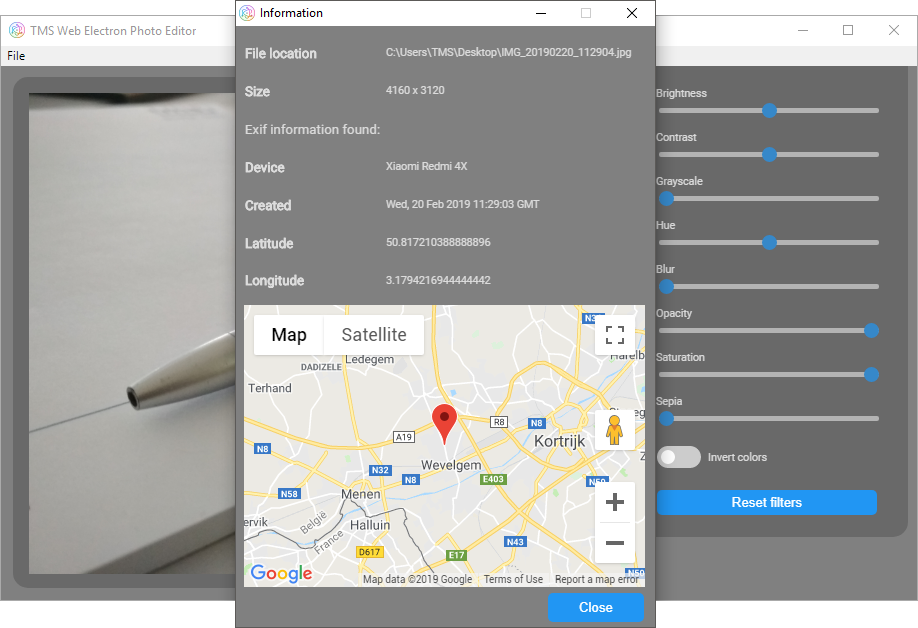
If this already got you excited, then we have more good news: further functionality such as extracting photo EXIF information from a JPEG and display it in a child window will be available in our Electron PhotoEditor demo. For extracting the EXIF information from JPEG file, an existing JavaScript library is used, giving us this functionality in a matter of minutes as we can easily consume this JavaScript library from a TMS WEB Core application. From the EXIF information, we can extract the geocoordinates where the picture was taken. The power & flexibility of TMS WEB Core enables us to visualize this on a map using the TWebGoogleMaps component. Again, goal and feature achieved in a matter of a few minutes and a minimum lines of code.
Building cross platform Electron application support is going to be the part of the TMS WEB Core v1.2 Padua release, and soon we are going to provide the first BETA to TMS ALL-ACCESS users! Don't miss out and get started today with TMS WEB Core! You can download the trial version that is generally available, go ahead with the standalone version you purchased or with TMS WEB Core and additional tools that are all included in TMS ALL-ACCESS. Our team looks forward to all your comments, feedback, feature-requests to help steering the development of TMS WEB Core to the next stages!
↧
Support is a built-in feature of TMS products!

At TMS, we are a team of software developers, developing software for software developers.
We do exactly the same as our customers are doing, that is developing software. And so we know all too well that when we are stuck with something, a fast helping hand is much appreciated.
That is why giving good and fast support is high on our priority list. That is why all our products come with minimum one year free support and free updates included. Yes, it is standard included in the product price, no extra costs at all, no limit on the number of questions!
Our support is handled in two ways: via a support online forum and by direct email for those who prefer a direct and private conversation.
For reasons of efficiency and quality of the support there is a very short line to the experts of the specific product support is asked for. In many cases, a direct dialogue is possible with the product expert.
On a daily basis, our support is standby for answering your questions about:
- your account, licensing conditions, purchasing products, renewing licenses
- doubts about product features, supported operating systems, supported IDEs
- issues with installing products
- doubts about a specific behavior in the product
- advice for achieving a high performance implementation with our products
- a problem, bug, unexpected behavior in a component
- ...
From time to time, our support is also contacted to request new product features or even new products. We very much welcome such questions and these have over the years steered the development of products in a significant way. For such suggestions, we enter in dialogue and make a judgment whether there is an estimated wide interest for a specific feature or not. When there is a wide interest, in many cases we take up the requested feature in the planning for a new development cycle of a product. When the request is very specific or of use only to a very small group of customers, we propose to deliver it as a custom paid development project.
We strive for satisfactory answers and solutions within 24hrs on work days. We're glad to report that our statistics show we achieve this goal for over 80% of the questions!
Thinking about the words of the painter and genius Salvador Dali "Have no fear of perfection, you will never reach it", we reflect on how we can get this number of 80% even higher.

That for sure is a challenge, given the technology landscape certainly didn't become easier. Where in the early days of our company, we had only a few Delphi or C++Builder versions to support and one operating system Windows XP, these days there is a myriad of technology to deal with. Ever changing and updating operating systems Windows, macOS, iOS, Android, Linux. Always evolving browsers Chrome, Firefox, Opera, Safari, Edge. Cloud services we interface with that changes APIs. A vast amount of different SQL and noSQL databases. And so on... The number of combinations, parameters, versions, ... is mind boggling. In a follow-up blog, we'll discuss how the process of delivering fast & quality support in a complex technology landscape can be achieved with your help.
Without a doubt, you also have ideas, suggestions, feedback or comments about support in general, so we look forward to hear about these.
↧
Enjoy more REST with FNC in the cloud
Intro
FNC is going to the cloud! We are currently working very hard to bring FNC to the cloud in the form of a TMS FNC Cloud Pack with a set of the most popular ready-to-use cloud service implementations, but before you can throw yourself into this new bag of FNC cloud service candies, we wanted to give you an insight on what is coming and also ask you a question on which cloud service(s) you wish to see being added in the future.Cross-Platform / Cross-Framework
FNC (Framework Neutral Components) is not a new story, you can find all about it on this page. FNC supports the following frameworks and platforms:- FMX
- Windows
- macOS
- iOS
- Android
- VCL
- Windows
- LCL
- Windows
- macOS
- Linux
- WEB
- Classic
- PWA (Progressive Web Application)
- Electron
So with FNC for the cloud, you will be able to target all of the above Frameworks and Platforms!
Asynchronous
While working on the FNC cloud core, we wanted to make sure that each action, whether it's retrieving a list of files, or uploading/download a file, is running seamless and doesn't interfere with the main thread. This makes your application responsive at all times and allows you to perform other tasks while waiting for the download/upload to finish, or the list of files to be loaded. This also gives the advantage that you can start multiple requests at once, and not having to wait until a specific request has finished. Of course, some requests require additional data that has been retrieved via another request, but we have made the request execution and data retrieval as flexible as possible. Below is a sample that shows the way the request is being made, and how the result is captured.procedure TRequestForm.DoRequestExecute(const ARequestResult: TTMSFNCCloudBaseRequestResult);
begin
//File Download Finished
end;
procedure TRequestForm.DownloadFile;
var
c: TTMSFNCSimpleCloudBase;
begin
c := TTMSFNCSimpleCloudBase.Create;
try
c.Request.Clear;
c.Request.Host := 'http://myhost.com';
c.Request.Path := '/download';
c.Request.Query := 'fileid=123';
c.Request.Name := 'Download File';
c.Request.Method := rmGET;
c.ExecuteRequest(DoRequestExecute);
finally
c.Free;
end;
end;
There is even a small bonus when targetting FMX or VCL. You can catch the result via anonymous methods as well! Anonymous methods are also coming to TMS WEB Core in a future update, so it will be possible to not only target FMX and VCL, but also have this code working for the web!
procedure TRequestForm.DownloadFile;
var
  c: TTMSFNCSimpleCloudBase;
begin
  c := TTMSFNCSimpleCloudBase.Create;
  try
    c.Request.Clear;
    c.Request.Host := 'http://myhost.com';
    c.Request.Path := '/download';
    c.Request.Query := 'fileid=123';
    c.Request.Name := 'Download File';
    c.Request.Method := rmGET;
    c.ExecuteRequest(
      procedure(const ARequestResult: TTMSFNCCloudBaseRequestResult)
      begin
        //File Download Finished
      end
    );
  finally
    c.Free;
  end;
end;
One code base
With FNC you can write your code once, and deploy it to several Frameworks / Platforms. This is also the case with FNC for the cloud. It relies on the TMS FNC Core and uses every aspect of FNC. You can write an old school VCL application and use the same code to target the recently and brand new PWA (Progressive Web Application) support in TMS WEB Core. Let us know for which Frameworks / Platforms you are writing an application with FNC.Custom development
The FNC cloud core has been designed to allow you, as a developer, write a component for a service not supported out of the box in the upcoming TMS FNC Cloud Pack. There is already a lot of functionality built-in and accessible. The list below shows what can be done when writing your own service.- Make GET, POST, PUT, UPDATE, DELETE and PATCH requests
- Support for multi-part form data via a separate form data builder class
- Built-in OAuth 2.0 authentication flow
- Built-in URL encoding, JSON parsing, file to Base64 encoding and many more
Let us ask you a question
We want to make sure we are not only providing a solid base for future development, we also want to know which service you are going to use. We already added a list of the most popular services, but we want to make sure that for future developments, we can accomodate to your needs. For this purpose, we want to ask you a question and vote on the service of your choice, or add a new one, if it's not already in the list. The list can be viewed at the following survey: https://www.survio.com/survey/d/N4J9X1C8L4V7K1U7V.Additionally, if you have any feedback, please comment on this blog.
More REST
We already want to thank you for filling in the survey and/or comment on this blog. The data will provide us with knowledge on how to improve our current developments and make the TMS FNC Cloud Pack even better. After all, we want you, as a customer, to enjoy more of that hard-earned REST after a full day of development. Stay tuned for more "FNC in the cloud" content coming in the near future!↧
↧
Realizing symbolic operations with user defined data
The main functionality of TMS Analytics & Physics developing library is evaluating math formula. The library supports evaluation of expressions containing real and complex numbers, common fractions, 3D vectors and tensors, arrays and matrixes. Nevertheless, one of the advantages of the library is that it can work with data of any types, specific for the developing application. The evaluation engine of the library is abstract and not bounded with real or other data types. Therefore, the library allows easily writing extensions for working with user defined types.
Let us consider the example for simple data type. Suppose we are writing some application and there is 2D vector type:
type
  TVec2D = record
  public
    X, Y: real;

  end;
And the application needs functionality for evaluating symbolic formula with vector data types. First, we need to use vector data in math formulae. The simplest way is introducing variables, containing this data type. This can be done using the following code:
var
  translator: TTranslator;

var
  x: TVariable;
  v: TVec2D;
begin
  translator:= TTranslator.Create;

  v.X:= 2.0;
  v.Y:=-3.0;
  x:= TObjectVariable.Create('u', TValue.From<TVec2D>(v), nil);
  translator.Add(x);

  v.X:= 0.0;
  v.Y:= 1.0;
  x:= TObjectVariable.Create('v', TValue.From<TVec2D>(v), nil);
  translator.Add(x);

  v.X:= 1.5;
  v.Y:= 2.5;
  x:= TObjectVariable.Create('w', TValue.From<TVec2D>(v), nil);
  translator.Add(x);
end;
The first line of code creates an instance of the TTranslator class, which realizes main functionality for working with math formula. Then we initialized a value of 2D vector and created the instance of TObjectVariable class. This class implements variable that can contain data of any type TVec2D in the case. Then the variable added to the translator instance using Add method. Next, other two variables introduced and now we can use variables with names u, v and w in math expressions.
The next step is introducing math operations for vector data. Say we need evaluating sum of vectors u+v. Then we must define the + operator for 2D vectors. Here we suppose that the vector type is entirely realized and it contains the addition method:
type
TVec2D = record
public
class function Add(const v1, v2: TVec2D): TVec2D;
end;
class function TVec2D.Add(const v1, v2: TVec2D): TVec2D;
begin
result.X:= v1.X+v2.X;
result.Y:= v1.Y+v2.Y;
end;
To introduce an operation for specific data types we must create the descendant for one of the base operator classes. Code for + operator is the following:
type
TVectorAdd = class sealed (TGenericAddOperator<TVec2D,TVec2D,TVec2D>)
protected
function TypedOperation(const v1, v2: TVec2D): TVec2D; override;
public
class function IsRealized: boolean; override;
end;
function TVectorAdd.TypedOperation(const v1, v2: TVec2D): TVec2D;
begin
result:= TVec2D.Addition(v1, v2);
end;
class function TVectorAdd.IsRealized: boolean;
begin
result:= true;
end;
The class TVectorAdd inherited from the base generic class TGenericAddOperator. This means that it is for defining + operation in math formulae. Its generic parameters define that the addition operation is implemented for two vectors and the result type is 2D vector. The main overridden method TypedOperation implements the function, which called when math formula contains + operation with two vector operands. Another method IsRealized returns true and informs the Analytics Evaluation Engine (AEE) that the class is entirely realized. The AEE uses Delphi reflection mechanisms to find the class and automatically applies it when required for formula evaluation.
Now we can write the code for symbolic formula evaluation with 2D vector data. Common code for any symbolic formula evaluation, including syntax checking and error processing, is the following:
var
f: string;
r: TValue;
begin
f:= EditF.Text;
try
if translator.CheckSyntax(f) then
begin
r:= translator.Calculate(f);
// code for processing result r
RichEditOut.Text:= RichEditOut.Text +#13#13+f+' = '+TUtilities.SafeToString(r);
end;
except
on ex: Exception do
begin
// code for error (exception) processing
RichEditOut.Text:= RichEditOut.Text +#13#13+f+#13+ex.Message;
end;
end;
end;
Where f is the symbolic formula for evaluation, r is the result value. The AEE uses as the result TValue type from RTTI unit, because it can wrap data of any type.
Now we have vector data (introduced variables u, v and w) and operator + to use in formula evaluation. For example, we could evaluate the following formula f=u+v. Unfortunately, trying to execute the code for this input data we get the exception, generated by AEE:
Binary operator + not found for operand types TVec2D and TVec2D.
Though we realized the class for + operator, according to the AEE paradigm, there is one more thing left. This is Delphis feature that must be taken into account here. If created application is standalone executable (without using run-time packages), Delphis compiler does not include compiled code for the class into binary data, if there is no direct reference to the class in the code. Therefore, we must include the reference to the class in our code. This can be done with the helper class TClassFinder. For doing this, we must include the following code in our application:
TClassFinder.InstantiateClass(TVectorAdd);
The method InstantiateClass does nothing at all, but this code allows introducing direct reference of the TVectorAdd class. It is recommended to write this code in the initialization section of the unit.
Executing the code for formula evaluation again, we get correct result:
u+v = (2 -2)
Now let us consider example of another operation realization vector negation (unary minus operator -). The operator class is the following:
type
  TVectorMinus = class sealed (TGenericMinusOperator<TVec2D,TVec2D>)
  protected
    function TypedOperation(const v: TVec2D): TVec2D; override;
  public
    class function IsRealized: boolean; override;
  end;

function TVectorMinus.TypedOperation(const v: TVec2D): TVec2D;
begin
  result:= TVec2D.Negation(v);
end;

class function TVectorMinus.IsRealized: boolean;
begin
  result:= true;
end;
The difference from + operator realization is that negation operator is unary (has one operand), so, the generic class contains only two parameters one for the operand type and one for the result. Now we can evaluate, for example, such formula -u+v. The evaluation result is -u+v = (-2 4).
Following the above algorithm, we can realize all math operations, defined in the Analytics library, for 2D vectors. There are more than 30 operators, one can realize for specific data types: =, , ?, >, <, =, =, +, -, *, /, , ×, ^, ~, v, ?, ?, ?, !, || and others.
The method of operation realization with creating descendants for base operator classes requires one class for every operation and data types. Nevertheless, the AEE includes another great feature that can simplify the process. It is called explicit operator overloading. The AEE uses Delphi reflection mechanism to find overloaded math operators for the record types and applies them for the data when required. So, if there is some overloaded math operator for 2D vector type, it will be automatically used for formula evaluation. As example, let here is overloading for multiply operator for 2D vector record:
type
TVec2D = record
public
class operator Multiply(const v1, v2: TVec2D): TVec2D;
end;
class operator TVec2D.Multiply(const v1, v2: TVec2D): TVec2D;
begin
result.X:= v1.X*v2.X;
result.Y:= v1.Y*v2.Y;
end;
Then * operator can be used in math formula for 2D vectors. For example, now we can evaluate the formula f=u+v*w and get the following result u+v*w = (2 -0.5).
The explicit operator overloading mechanism is very useful, because often specific data types, for which symbolic operations have to be realized, already contains overloaded math operations. It should be noted here, that not all operators, defined in Analytics library, can be used with this mechanism. This is because not all of the operators have direct analogue in Delphi language. More information about this can be found in the developers guide for the Analytics library (reference).
Another type of operations, used in math formulae, is function. The AEE provides the same mechanism for introducing functions with specific, user defined data. Namely, creating a class, inherited from one of the appropriate base function classes. Here is the code of realizing sin function for 2D vector argument:
type
  TVectorSin = class sealed (TGenericSimpleFunction<TVec2D,TVec2D>)
  protected
    function Func(const v: TVec2D): TVec2D; override;
    function GetName(): string; override;
  public
    class function IsRealized: boolean; override;
  end;

function TVectorSin.GetName: string;
begin
  result:= 'sin';
end;

function TVectorSin.Func(const v: TVec2D): TVec2D;
begin
  result.X:= sin(v.X);
  result.Y:= sin(v.Y);
end;

class function TVectorSin.IsRealized: boolean;
begin
  result:= true;
end;
The class TVectorSin inherited from TGenericSimpleFunction because it has one argument only. Generic parameters of the class define the type of the argument and the type of functions result. The GetName method returns the name of the function sin. The Func method implements main functionality - applies sine function to the vectors components. The IsRealized method is the same as for operator realization.
Now we can evaluate formulae with vector data, containing the sine function. For example, evaluating formula -u+sin(v*w) produces the following result -u+sin(v*w) = (-2 3.59847214410396).
The example demonstrated that, realization of a function for specific data type is as simple as operator realization. The only difference is that function requires additional method for providing its name. One can give a function any name (satisfying the syntax rules), but it is recommended using for standard functions their predefined names (see developers guide of the Analytics library).
Let us consider one more example of function realization for 2D vectors. This will be conditional if function. The Analytics library allows defining functions not only with arguments, but also with parameters. For example, in math logarithm function , a can be considered as a parameter (not argument). According to the syntax of the Analytics library, the function would be written as following formula log{a}(x). The conditional if function has the following syntax:
if{condition}(x1 x2)
where condition is any logical expression (that returns Boolean result), x1 and x2 expressions with same result type. The function logic is the following: it calculates value of the condition expression; if the value is true, the function returns result of x1 expression evaluation; else, it returns result of x2 expression evaluation.
For if function realization with vector data, first let us introduce the comparison > operator for 2D vectors. We implement this by overloading Delphis > operator with the following code:
type TVec2D = record public class operator GreaterThan(const v1, v2: TVec2D): boolean; end; class operator TVec2D.GreaterThan(const v1, v2: TVec2D): boolean; begin result:= (sqr(v1.X)+sqr(v1.Y)) > (sqr(v2.X)+sqr(v2.Y)); end;
Now we can compare vectors and the result of the comparison is Boolean value. The next step is creating a descendant of some base function class. The Analytics library implements special base class for if function, so the realization code is very simple:
type
  TVectorIf = class sealed (TGenericIfFunction<TVec2D>)
  public
    class function IsRealized: boolean; override;
  end;

class function TVectorIf.IsRealized: boolean;
begin
  result:= true;
end;
The base class TGenericIfFunction implements all logic for evaluation and default name if. Therefore, the realization for 2D vectors provides only information about functions result type (parameter of the generic) and that the function can be used by AEE. And this is all, now we can use if function for vector data. Evaluating formula if{v+w>u}(-u+v w*sin(v*u)) we get the result if{v+w>u}(-u+v w*sin(v*u)) = (-2 4).
The examples of functions realization demonstrated one way of evaluating math formulae with data of specific types. The functionality of the library is not restricted only with these simple cases. It allows introducing functions with any number of arguments (or/and parameters). One even can realize logic for symbolic differentiation of introduced functions and use derivative operator in formulae.
The latest version of the library available here. Source code of the example application can be downloaded from here
↧
Adding the 3rd dimension to TMS WEB Core

Our team is working hard on the next major release of TMS WEB Core. This will be TMS WEB Core v1.2 Padua. Padua is the next city after Brescia (1.0) and Verona (1.1) on our Mille Miglia race track.
We have shown already a preview of the support for Electron based cross platform desktop apps that will come out of the box with TMS WEB Core v1.2. The new version 1.2 will also come with numerous Object Pascal to JavaScript transpiler enhancements (Pas2JS v1.4) with most importantly the support for anonymous methods. There is a lot more coming that we will unveil in the coming weeks!
With this blog, we wanted to take you to the 3rd dimension that will be added to TMS WEB Core in v1.2, that is the support for 3D graphics based on the amazing WebGL / ThreeJS technology. Thanks to this technology, rendering 3D scenes is fluid and fast right out of any modern browser. This means Chrome, FireFox, Opera, Safari on desktop and on mobile devices.
The WebGL / ThreeJS technology is powerful but it can be quite complex and daunting. Here comes the TMS WEB Core framework with easy usable classes for taking advantage of this technology.
In the upcoming TMS WEB Core this will be exposed via 3 UI controls:
- TWebThreeJSPaintBox
- TWebThreeJSChart
- TWebThreeJSMathChart
Custom 3D scenes with TWebThreeJSPaintBox
The TWebThreeJSPaintBox is a simple 3D scene renderer. Where in a regular 2D PaintBox you do the drawing with lines, rectangles, ... here you can add 3D objects like cube, sphere, cylinder, text, lines, shapes, 3D models ...
Adding a red sphere becomes as simple as:
var
  anObject: TThreeJsObject3D;

begin
  anObject := threeJsPaintBox.addSphere(2, clRed, 10, 8, 4);
  anObject.name := 'sphere1';
  threeJsPaintBox.Invalidate;
end;
This sphere object can now be manipulated or removed again by accessing the object by its name.
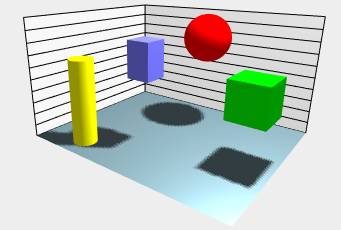
As such, the TWebThreeJSPaintBox allows to create any custom 3D scene easily using the ObjectPascal language.
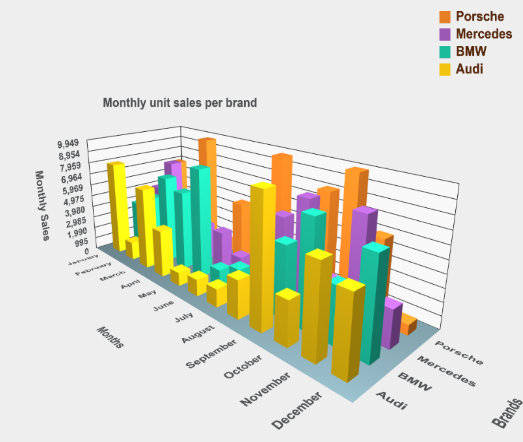
3D business charts with TWebThreeJSChart
The next 3D control is the TWebThreeJSChart. This is a 3D chart with 3 axes. It allows to add series with their 3D values, select the chart type (bar, cone, line, area, cylinder, scatter) and the TWebThreeJSChart will do all that is necessary to setup the 3D scene to render the chart.
We have created a small & quick demo to demonstrate the power. This 3D chart visualizes the virtual sales results of Germany's leading car manufacturers: Audi, BMW, Mercedes, Porsche. To make the data editable to let users play with the chart, it is displayed in a TWebStringGrid. It shows 4 columns for the sales results for the 4 car manufacturers and 12 months of the year. To configure the 3D chart from the results in the TWebStringGrid, the following code is used:
procedure TForm2.LoadSampleSeries;
var
  aSeries: TThreeJsChartSeries;
  brands: TJSArray;
  months: TJSArray;
  values: TJSArray;
  i,j,v: integer;
begin
  brands := TJSArray.new;
  months := TJSArray.new;

  // create the X-axis for the series filled with the car brand names from the string row header
  for i := WebStringGrid1.ColCount - 1 downto 1 do
    brands.push(WebStringGrid1.Cells[i,0]);

  // create the Y-axis for the series filled with the month names
  for i := 1 to WebStringGrid1.RowCount - 1 do
    months.push(WebStringGrid1.Cells[0,i]);

  // create the series in the 3D chart
  aSeries := TThreeJsChartSeries.Create(brands, months);

  // loop through the normal grid cells to pick the sales values and add these to the series
  for i := WebStringGrid1.ColCount - 1 downto 1 do
  begin
    values := TJSArray.new;
    for j := 1 to WebStringGrid1.RowCount - 1 do
    begin
      v := StrToInt(WebStringGrid1.Cells[i,j]);
      values.push(v);
    end;
    aSeries.addLegendRow(WebStringGrid1.Cells[i,0], values);
  end;

  // set the general 3D chart properties
  aSeries.AutoMarkValueAxis := true;
  aSeries.valueFormatFloat := '#,##0';
  aSeries.valueAxisFormatFloat := ''; //use the above
  aSeries.Title := 'Monthly unit sales per brand';
  aSeries.ValueAxisTitle := 'Monthly Sales';
  aSeries.LegendAxisTitle := 'Brands';
  aSeries.CategoryAxisTitle := 'Months';
  threeJsChart.Series := aSeries;
end;
It is really as simple as this. Note that you just need to create the data series and it figures out the range of values automatically. It has an Auto range mode that is smart enough to figure out the vertical value range scale and its scale marking automatically based on the minimum and maximum values in data. You can also switch off the Auto range mode and supply your own scale marking when needed.The code results in the following 3D chart or you can play with it directly from your browser.
Mathematical surfaces with TWebThreeJsMathChart
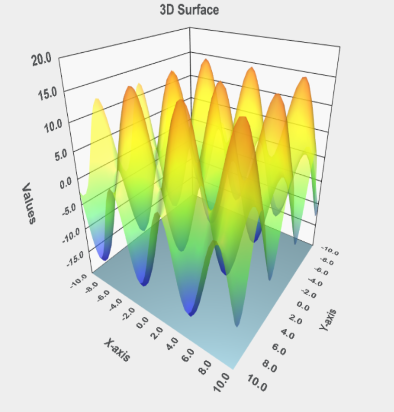
Finally, the last 3D control is the TWebThreeJsMathChart that is specialized in mathematical surface rendering, both with wireframe and solid surfaces.
TWebThreeJsMathChart is based on a TThreeJsMathChartSeries that is set for the 3D chart and this TThreeJsMathChartSeries implements a callback function that will query the mathematical formula calculation. The setup for the math chart and the X and Y range wherein the result needs to be calculated is set via:
begin
  aSeries := TThreeJsMathChartSeries.Create;
  aSeries.addParametricSurface(-10, +10, -10, +10, resolution, @surfaceCallBack);

  aSeries.Title := '3D Surface';
  aSeries.ZAxisTitle := 'Values';
  aSeries.YAxisTitle := 'Y-axis';
  aSeries.XAxisTitle := 'X-axis';

  threeJSMathChart.Series := aSeries;
end;
As we demonstrate a number of different mathematical functions to visualize in the demo, the callback function is implemented as:
function TForm2.surfaceCallBack(x, y: double): double;
begin
  // the function is selected via the combobox cbSeries
  case cbSeries.ItemIndex of
    1: Result := abs(x-y);
    2: Result := -x*x - y*y + 6;
    3: Result := sin(x)*x+cos(y)*y;
    4: Result := 2 * sqrt(x*x/3 + y*y/8);
    5: Result := sqrt(abs(1.5 * (x*x/3 - y*y/4) - 6));
    6: Result := 8 * (sin(x) + cos(y));
  else
    Result := x*x + y*y;
  end;
end;
It's really nothing more than this before you can start drooling over the wonderful world of 3D mathematical functions.
You can see it live from your own browser here.
Get started
Meanwhile, you can go ahead and explore the new & exciting territories of web client development that become available for Delphi developers with TMS WEB Core! You can download the trial version that is generally available, go ahead with the standalone version you purchased or with TMS WEB Core and additional tools that are all included in TMS ALL-ACCESS. Our team looks forward to all your comments, feedback, feature-requests to help steering the development of TMS WEB Core to the next stages!
↧
Syntax highlighting editor coming to TMS WEB Core 1.2 Padua
We have already covered many exciting things that are coming to TMS WEB Core v1.2 Padua such as support for 3D graphics or cross platform desktop applications with Electron, but there is still more to come!
We would like to introduce another addition to you, that we have created from the widely known and used open source Ace editor.

In the new TWebSyntaxMemo component we have exposed a lot of Ace's basic functionalities, like:
- language/mode setting
- theme setting
- numerous editor settings related to gutter, text wrapping, tabs, etc... that are responsible for the look and behavior of the editor
Combining everything that has been mentioned above and what's already available in TMS WEB Core, instead of days of work, you can have your own code editor in a matter of an hour! With very little effort you can create a web application that is capable of loading a file, detecting the opened file's extension and changing the editor's mode on the fly to match the file's type. You can add support for drag and drop functionality through the exposed events too!
TWebSyntaxMemo is going to be available for regular web applications, PWA and Electron applications at the same time! A demo for Electron will be waiting for you in our next release, but if you can't wait to check out the TWebSyntaxMemo in action, then you can already take a look at our demo here.
↧
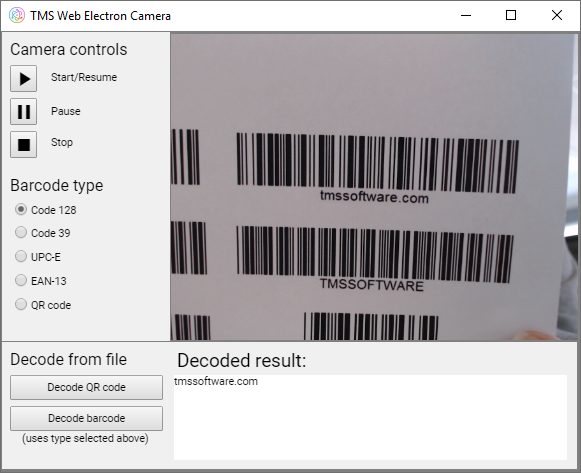
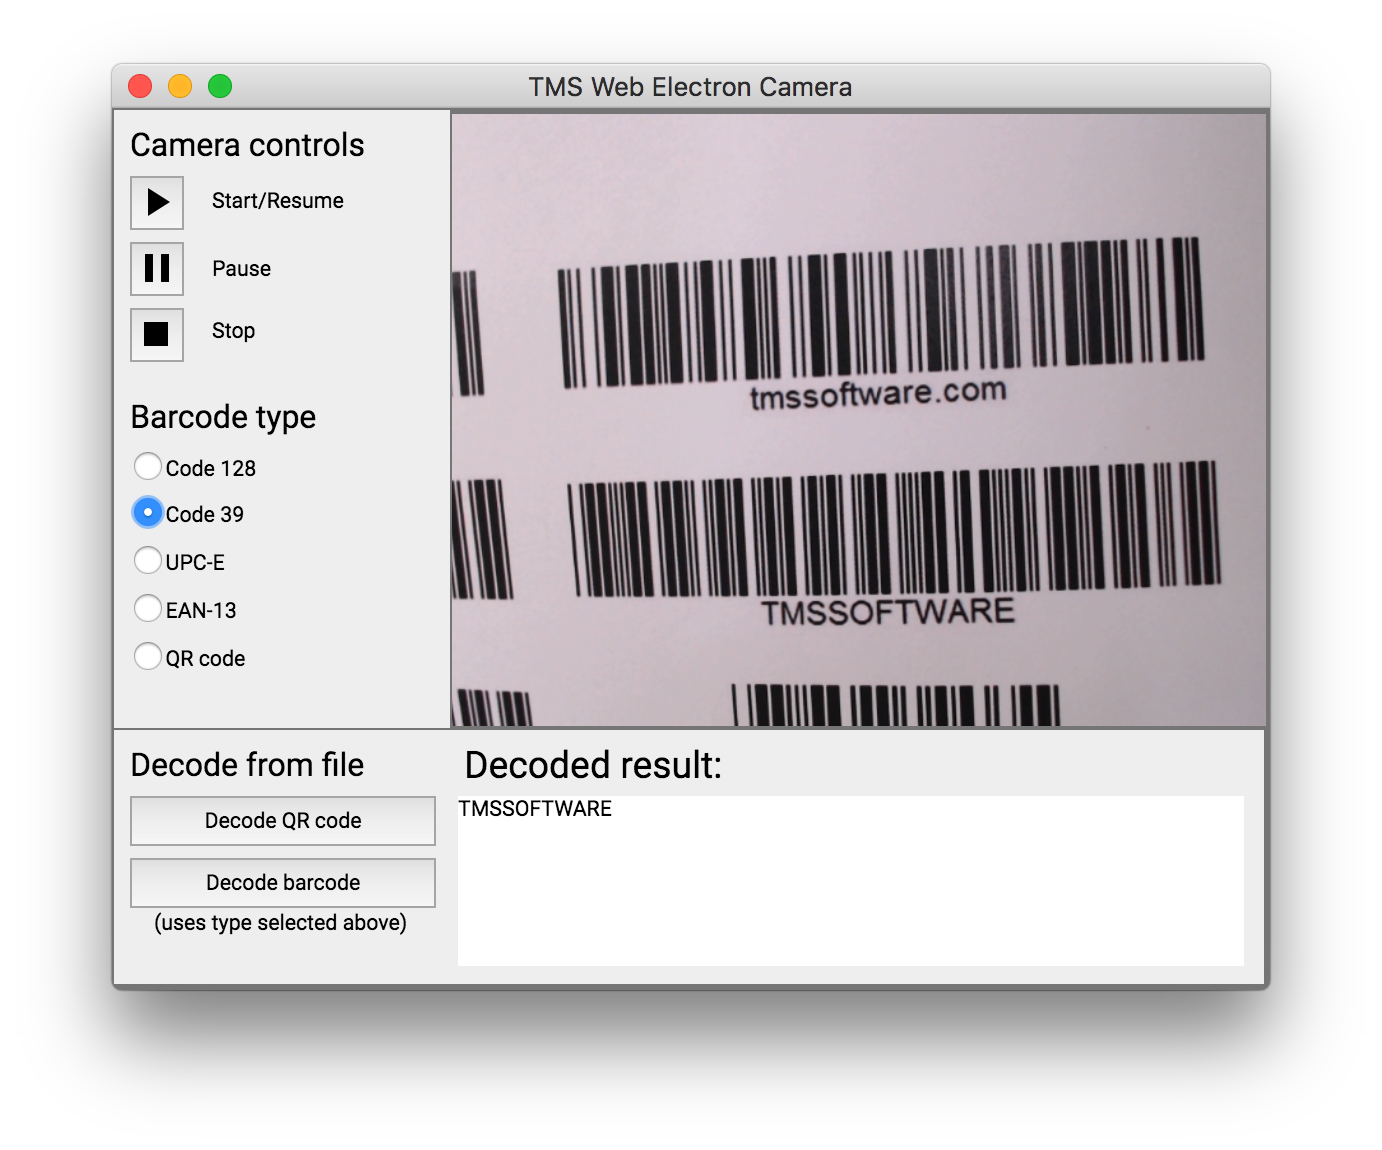
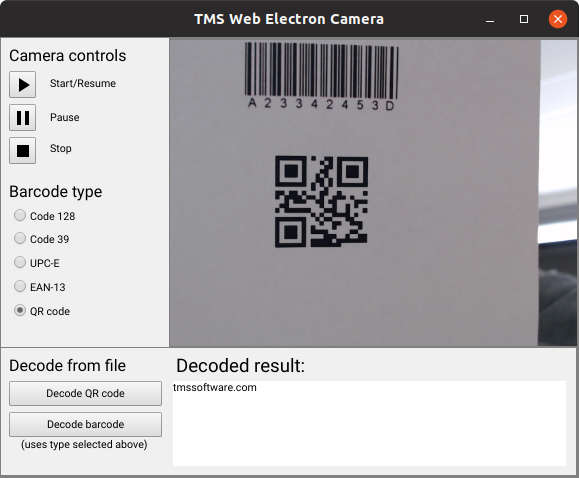
Access the camera with TMS WEB Core 1.2 Padua
In the past two weeks we have given some insight on the upcoming support for 3D graphics and a new syntax highlighting editor, and we have promised that there will be more to come to TMS WEB Core v1.2 Padua. It's time to continue with some more new components: TWebCamera, TWebQRDecoder and TWebBarcodeDecoder.
The TWebCamera is based on the MediaDevices.getUserMedia() API. It provides an easy access to the users' web camera via the exposed and implemented methods, properties and events. The TWebQRDecoder and TWebBarcodeDecoder components are using the external jsQR and quaggaJS JavaScript libraries. As you have probably already guessed from the name, they are capable of decoding QR codes and barcodes of different types.
Let's take a look at a quick and simple example with the TWebQRDecoder.
Example
We would like to access a camera that we can use to decode QR codes. It might seem like a complicated task at first glance, but it only takes a minute and two lines of codes to achieve this!
First drop the needed components onto the form: a TWebCamera, a TWebQRDecoder and a TWebMemo to show the results (and don't forget to add the needed external library to the project!). Then assign the TWebCamera component to the TWebQRDecoder.Camera property. Now that they are connected, as a next step, set the TWebQRDecoder.EnableTimer property to True. With that enabled, the decoder will try to get and decode images from the assigned camera.
Let's start the camera in the form's OnCreate event:
procedure TForm1.WebFormCreate(Sender: TObject);
begin
  WebCamera1.Start;
end;
That was one line of code above, so what's left is retrieving the result from the decoder. Luckily we have an OnDecoded event that we can use:
procedure TForm1.WebQRDecoder1Decoded(Sender: TObject; ADecoded: string);
begin
  WebMemo1.Text := ADecoded;
end;
And this is it. With this second line of code our basic QR code reading application is ready, and it really only took a minute!
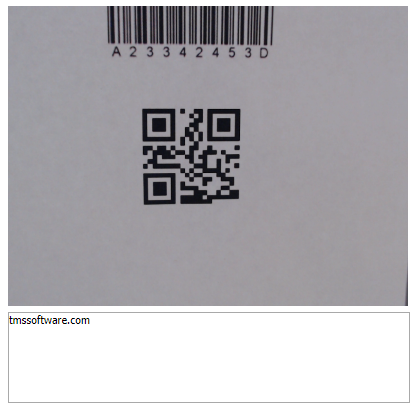
If you would like to see and play with it already, then you can check out our demo here, which includes decoding using the TWebBarcodeDecoder too!
And of course we have also tried these new components against our new and upcoming TMS Web Electron Application which allows to create desktop Windows, macOS and Linux applications from a single source code base:
Get started
Meanwhile, you can go ahead and explore the new & exciting territories of web client development that become available for Delphi developers with TMS WEB Core! You can download the trial version that is generally available, go ahead with the standalone version you purchased or with TMS WEB Core and additional tools that are all included in TMS ALL-ACCESS. Our team looks forward to all your comments, feedback, feature-requests to help steering the development of TMS WEB Core to the next stages!
↧
↧
TMS WEB Core v1.2 Padua beta is here for TMS ALL-ACCESSS users

Our team is working around the clock for the huge update that TMS WEB Core v1.2 is.
The combination of the number of improvements and new features is mind-blowing.
We thought it was time to give our TMS WEB Core v1.2 Padua beta in your hands so you can not only benefit from the many improvements but also assist with your feedback for the further polishing for the release.
Here is a list of what is improved and new in TMS WEB Core v1.2:
- New: Latest pas2js compiler integration with support for anonymous methods, class helpers, advanced records
- New: Electron target that can be choosen to create cross-platform desktop applications for Windows, macOS, Linux
- New: Easier browser target selection with the TMS browser selector toolbar for the Delphi IDE
- New: Support for Lazarus 2.x
- New: 3D chart, objects and scenes support
- New: Syntax highlighting editor control added
- New: Camera control component & QR code + barcode decoder component
- New: File picker for local file retrieval
- New: IndexedDB access classes
- New: Grid checkbox cell & column support
- New: Responsive grid panel
- New: Treeview and accordion component
- Numerous improvements to existing components, integration in the IDE, use of templates, ...
Curious about this new fascinating worlds of possibilities or interested to start using the many improvements in v1.2, login on our website with your credentials. TMS ALL-ACCESS users and TMS WEB Core registered users will find the 1.2 beta download on their user account download page.
Our team looks very much forward to your feedback. We are very much looking forward to hear about your experience with TMS WEB Core v1.2 Padua beta and to hear what you'd like to see improved for this major release or what you want to see coming in future releases!
↧
TMS FNC Cloud Pack BETA
First BETA!
We are excited to announce the first BETA of the TMS FNC Cloud Pack!What's included
Included in the first BETA of the TMS FNC Cloud Pack is the ability to create/implement your own service(s). There is a small accompanying guide available after installation, that explains a few of the basics to get started. Additionally, below is a list of some of the many features that are supported in the TMS FNC Cloud Pack.- Implement and use your own service(s) built on top of the TMS FNC Cloud Pack core
- Make GET, POST, PUT, UPDATE, DELETE and PATCH requests
- Support for multi-part form data via a separate form data builder class
- Built-in OAuth 2.0 authentication flow
- Built-in URL encoding, JSON parsing, file to Base64 encoding and many more
Included in the TMS FNC Cloud Pack is a set of ready-to-use services that are listed below.

|
|

|
|

|
|

|
|

|
|

|
|

|
|

|
|
We want your feedback!
In this blog post, we already asked you for which service(s) you wish to see an implementation. We already received a lot of feedback, and want to thank you for this. This allows us to continue development in future updates of TMS FNC Cloud Pack. For those that didn't yet fill in the survey, please go to https://www.survio.com/survey/d/N4J9X1C8L4V7K1U7VWe want your feedback, so we can improve the TMS FNC Cloud Pack even more, so we want to ask you for a thorough testing on TMS FNC Cloud Pack and provide us with any feedback, comments, suggestions and issues you experience. This can be done via comments on this blog, or an email to support@tmssoftware.com
How to get access to the BETA version?
The BETA version is available to all active registered users of the TMS ALL ACCESS. The BETA download link should be available after logging in, and going to the My Products page. Alternatively, the subscription manager should also list TMS FNC Cloud Pack as a registered download.↧
New features in TMS Analytics & Physics 2.8
The previous version 2.7 of TMS Analytics & Physics library introduced the capability of converting formula and units of measurements to the TeX format. The TeX representation allows then drawing formula in natural math form, using some external tools, such as MathJax.
The new version 2.8 provides some improvements of formula conversion and includes new capabilities. The main new feature is converting standard functions to math operators. For example, exponent function exp(x) can be converted to the form of power operation as ex. The following standard functions supported: sqrt, root, pow, abs and exp. The option of converting functions to the operation format can be on or off, allowing different representation of the formula.
Let us consider the following formula, containing several standard functions sqrt(x^2-1)+root{3*n}(x/2)*abs(x-A)-exp(x^2)*pow{n/2}(x+1). This formula can be converted to the TeX format in two different ways: with or without converting functions to the operation format. Here is the formula drawing for these two cases:
- without function conversion:
![]()
- with function conversion:
![]()


Another improvement is new simplifications of math expressions. Simplifying math expressions allows better representation of math data. Simplified formula is more suitable for reading and perception. For example, the expression simplification implicitly used after symbolic derivative calculation, because this can significantly reduce the result. For example, let us consider the following formula:
Evaluating symbolic derivatives for the expression, we can get two results. The first result evaluated using formal recursive chain algorithm without simplifications:

Next formula is the same expression after simplification:

The last version 2.8 of the library supports the following simplification algorithms:
- Expanding nested sum, product and power expressions
- Collecting constant addends in sum expressions
- Reducing addends in sum expressions
- Combining constant multipliers in product expressions
- Reducing multipliers in fraction expressions
- Combining power expressions with multipliers
- Simplifying integer square roots and modulus of negative data
The expression simplification can be used explicitly in the code, calling the Simplify method of the TTranslator class. Here is an example of the formula simplification demonstrating the algorithms: Initial formula:

Simplified formula:

TMS Analytics & Physics 2.8 is already available.
↧
Video: Developing a Database-driven Web Application with Delphi Rio and TMS Web Core
Delphi is the number one tool for developing Desktop applications on and for Windows. There is little opposition to this statement. A couple of years ago, the compiler for 64-Bit Windows was also released. Having the VCL at your mercy and extensive database connectivity included in the product, Delphi is also at the top whenever databases come into the mix. However, Delphi never has become known as the front-runner for Web Application development. Even though components to access the web and a web framework come with the product, for many Delphi and Web Development are never mentioned in the same train of thought.
Winter Change is here
TMS Software changed the game plan in 2017 by introducing TMS Web Core as their new framework to develop web applications. You can find a lot of information about this framework on the internet. Simply start your journey at the following web page and you will find videos, articles and event dates to learn more about it:

Since its introduction in 2017, TMS has added many features and components to the framework. At this time it is even possible to develop Progressive Web Apps (PWA) and multi-platform desktop (!) applications using the Electron framework.
Practical examples
Some developers say that practical and realistic examples are more important than marketing material. This is where I came in to produce videos that show how to use TMS Web Core for certain development tasks.
I wanted to build a tutorial series that abides by the following guidelines:
- Data taken from a real, active data source/database that is still being maintained
- Demos should be reproducible and easily accessible, including the data that is being used
- Build it all from scratch and start with a very simple example
- Further, more complicated tutorials will be based on the foundation
Today, I would like to introduce the so-called School Data Series School Series in short. It follows those guidelines exactly. I used a database published by the administration of Lee County, Florida in the US. The data lists all the schools (e.g. public elementary, middle and high-schools) in the county with many attributes:
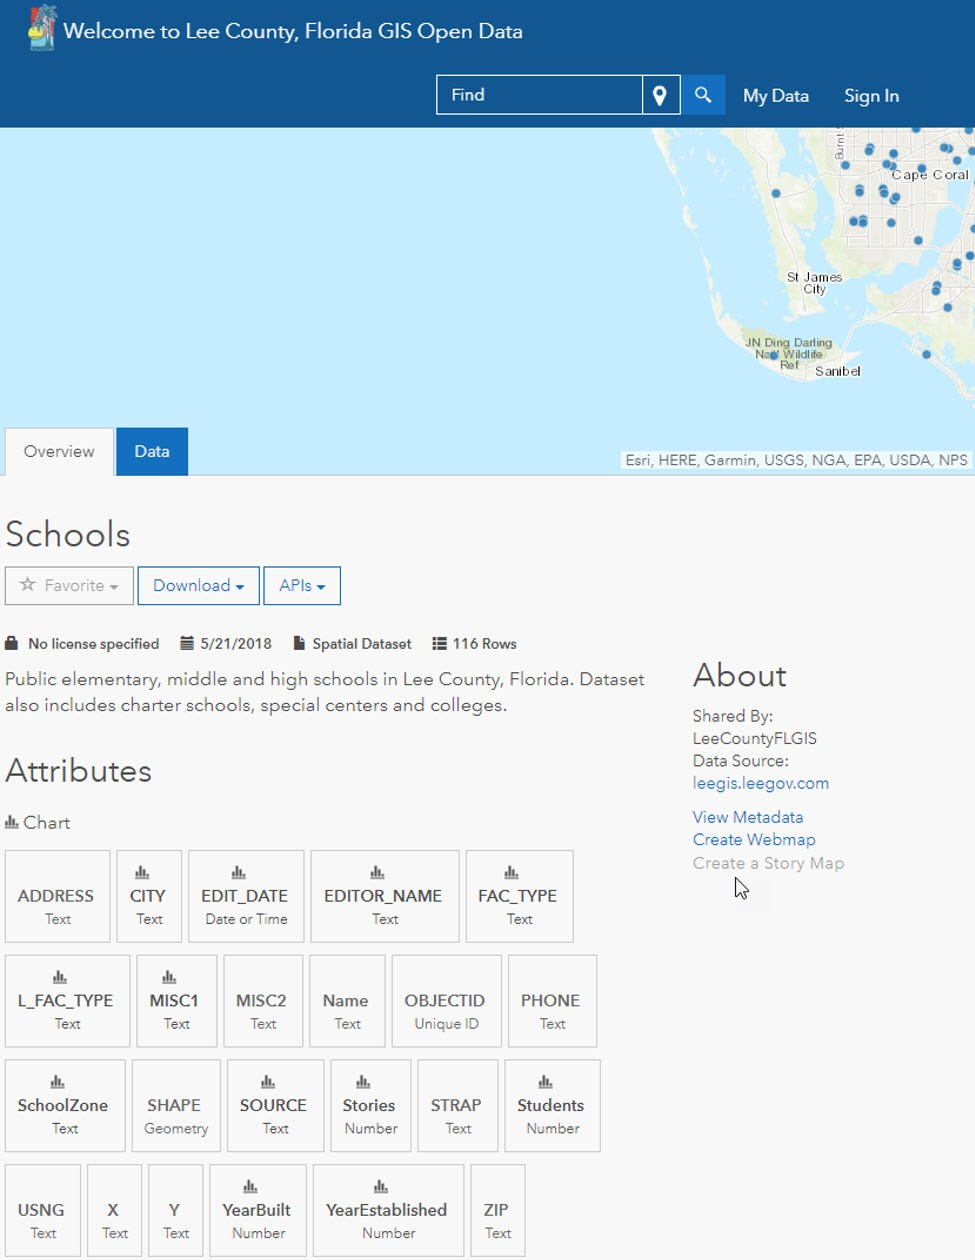
As you can see in the screenshot, it is possible to download the data and import it into a database.
This will be the starting point for the tutorial.
Video 1: Connect to database, access from Web App
The first video introduces the content and will also give a brief overview where the series will be going in later parts. However, the focus is on the question how to connect to the data from a web application. Delphi developers usually can use a connection, query and a grid to display data from a database. To the surprise of most people that do not know about TMS Web Core, this is exactly how it works in TMS Web Core. The only hurdle you will have to tackle is the fact that the connection requires another layer between the application and the database server. This layer consists of a web service that provides REST access to the database. The tutorial will give you all the arguments why this approach makes sense and the approach without a web service is not to be considered.
This will be covered:
- Introduction to the video series
- Get to know the data
- Build a REST web service with JSON support using TMS XData
- Build a TMS Web Core application with
- connecting to the web service
- using database connections and datasets during design-time
- display all data in a grid
- Outlook on other parts of the series
- adding data from the database to Google Maps
- display charts based on the info from the database with Google Charts
- add professional web design using Bootstrap
I will follow up with further blog posts about all the parts of the series.
The complete series will always be available in a handy playlist on YouTube here:
↧
↧
Video: Creating a database-driven, interactive Google Maps web application with Delphi Rio
Part 2 of the School Data Video Series shows you how to write a web application that offers an interactive Google Map with data that is taken from a database. In order to access the database it uses the REST web service that was built in part 1.
The video shows by giving easy to follow step-by-step instructions:
- Getting to know the data in the database
- Build REST queries in the web browser
- Implement a TMS Web Core application
- Access the REST web service
- Request data
- Add markers to the Google Map component
- Use a special, pre-defined icon for the marker
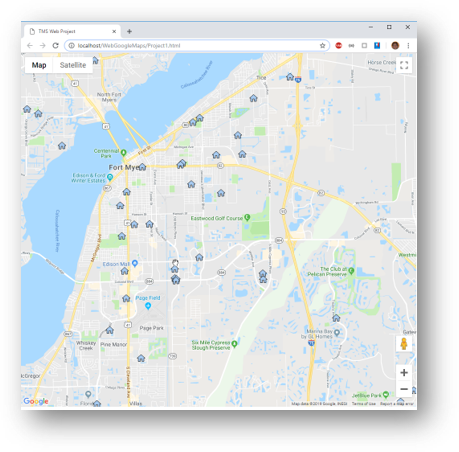
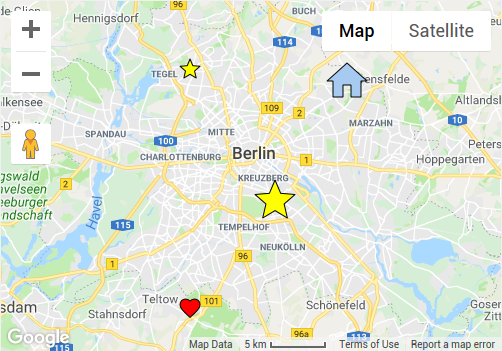
Heres a little teaser what the app will look like in the end:
The video is part of the playlist, but heres a direct link to part 2:
↧
Adding web design with Bootstrap 4 to a TMS Web Core application
Another video in the School Data Series adds professional modern web design to the web application that was built in the previous video. It is a common misconception that the form designer restricts the design capabilities of web frameworks built with Delphi. Giving a practical example will make it very easy for you to build your own projects with web design. You will also know how to include web designers into the development process of your web applications.
You will see how to transform this form
into this form:

To sum up the complete contents of the video:
- Review of what has been developed so far
- Replace Google Maps API marker with custom icon
- Build a mockup for the design in Adobe Photoshop
- Transfer the design into HTML with Adobe Dreamweaver
- Add the web design to your existing project
- Link TMS Web Core components to the new web design
You can find the video right here:
↧
The TMS WebGMaps v3.1 update includes map styles and SVG markers
We're pleased to announce TMS WebGMaps v3.1 has been released today. TMS VCL WebGMaps is our component for VCL development that exposes a myriad of geographical functions for integration in Delphi or C++Builder Windows applications while TMS FMX WebGMaps offers the same functionality for cross-platform FireMonkey applications on Windows, Mac, iOS and Android.
In this new version we introduce the functionality to display the map in a custom style. You can use the pre-defined Night Mode style or any other custom style.

The code needed for this is just one line of code:
WebGMaps1.MapOptions.MapStyle := mstNightMode;
The code needed for this is just two lines of code:
  WebGMaps1.MapOptions.CustomStyle.Text := '[JSON Object]';
  WebGMaps1.MapOptions.MapStyle := mstCustom;
Use the Google Maps Platform Styling Wizard as a quick way to generate your own JSON styling object.
Another new feature are SVG Markers. This technique allows to display markers with a custom shape based on a SVG path. Several pre-defined shapes are available as well as the possibility to add your own custom SVG path.
Adding markers with a custom shape is very easy as this code snippet shows:
var
  m: TMarker;
begin
  m := WebGMaps1.Markers.Add(WebGMaps1.MapOptions.DefaultLatitude, WebGMaps1.MapOptions.DefaultLongitude);
  m.Shape := msStar;
  m.ShapeColor := clYellow;
  m.ShapeScale := 2;
  WebGMaps1.UpdateMapMarker(m);

  m := WebGMaps1.Markers.Add(WebGMaps1.MapOptions.DefaultLatitude + 0.1, WebGMaps1.MapOptions.DefaultLongitude - 0.1);
  m.Shape := msStar;
  m.ShapeColor := clYellow;
  WebGMaps1.UpdateMapMarker(m);

  m := WebGMaps1.Markers.Add(WebGMaps1.MapOptions.DefaultLatitude - 0.1, WebGMaps1.MapOptions.DefaultLongitude - 0.1);
  m.Shape := msFavorite;
  WebGMaps1.UpdateMapMarker(m);

  m := WebGMaps1.Markers.Add(WebGMaps1.MapOptions.DefaultLatitude + 0.1, WebGMaps1.MapOptions.DefaultLongitude + 0.1);
  m.Shape := msHome;
  m.ShapeColor := clSkyBlue;
  m.ShapeScale := 2;
  WebGMaps1.UpdateMapMarker(m);
end;
Today's update also includes other smaller new features and improvements.
We look forward to learn about your interesting integrations of TMS WebGMaps in your applications!
↧
Video: Add Google Charts based on a database query to web applications in Delphi Rio

The next videos of the School Data Series tackle the visualization of numbers using Google Charts.
Due to the amount of detail, I decided to split this topic into 3 separate videos.
The end result will look like this:

Student numbers will be grouped by zip code. Users are able to click on the bars and drill-down all the schools in that area (master-detail).
The first video covers:
- Looking at the database
- Build the database query for the chart
- Convert database query into URL
- Add service method to XData web service for charting
The next video will show you how to build the web application that consumes the data. Finally, the last video adds the user-interaction with the popup-window. Look out for these parts, they will be published soon.
The first video is available here:
↧
↧
TMS FNC Cloud Pack is here!
First release!
We are excited to announce the first release of the TMS FNC Cloud Pack!What's included
Included in the TMS FNC Cloud Pack is the ability to create/implement your own REST service client(s). There is a small accompanying guide available after installation, that explains a few of the basics to get started. Additionally, below is a list of some of the many features that are supported in the TMS FNC Cloud Pack.- Create your own REST service client(s) built on top of the TMS FNC Cloud Pack core
- One source code base to use on multiple frameworks (FMX, VCL, WEB and LCL)
- Make GET, POST, PUT, UPDATE, DELETE and PATCH requests
- Support for multi-part form data via a separate form data builder class
- Built-in OAuth 2.0 authentication flow
- Built-in URL encoding, JSON parsing, file to Base64 encoding and many more
Included in the TMS FNC Cloud Pack is a set of ready-to-use REST service client implementations that are listed below.
|
|
|
|
|
|
|
|
|
|
|
|
|
|
|
|
|
|
|
|
|
|
|
|
How to create your own REST service client?
To illustrate how to create your own REST service client, we take the source code from accessing a Google service, such as Google Drive. Google Drive has a common layer in where the authentication flow and access token generation are handled to allow other services from Google implement the APIs on top of this layer. The first step is to generate the authentication URL.function TTMSFNCCustomCloudGoogle.GetAuthenticationURL: string;
begin
Result := InitializeAuthenticationURL(Self);
end;
function InitializeAuthenticationURL(const ACloudBase: TTMSFNCCloudBase): string;
var
url, sc: string;
begin
sc := TTMSFNCCloudBaseOpen(ACloudBase).GetScopes('+', True);
url :=
'?scope=' + sc
+ '&state=profile'
+ '&redirect_uri='+ TTMSFNCUtils.URLEncode(ACloudBase.Authentication.CallBackURL)
+ '&response_type=code'
+ '&client_id=' + ACloudBase.Authentication.ClientID
+ '&approval_prompt=force'
+ '&access_type=offline'
+ '&hl=en';
url := 'https://accounts.google.com/o/oauth2/auth' + url;
Result := url;
end;
The URL is a concatenation of The ClientID, CallBackURL, some default parameters and a set of scopes, which is crucial to allow the user to identify which services is accessing which information. For Google Drive, the scopes are added in the constructor:
  Scopes.Clear;
  Scopes.Add('https://www.googleapis.com/auth/drive');
  Scopes.Add('https://www.googleapis.com/auth/drive.file');
  Scopes.Add('https://www.googleapis.com/auth/userinfo.profile');
When calling the Connect method, and the Access Token is not yet retrieved, or no longer valid, a browser is shown which allows identifying and authorizing the application which is requesting access to your files/folders and account information. Below is a screenshot of the browser and the scopes that are requested via the authorization URL.

After Clicking on the Allow button, the Application is redirected back to your application which runs an HTTP Server listening to the Callback URL & Port set via Authentication.CallBackURL. As soon as the HTTP Server catches the OAuth 2.0 redirect callback URL, it parses the URL and generates an authentication token. The next step is to take the authentication token and convert it to an access token:
procedure TTMSFNCCustomCloudGoogle.RetrieveAccessToken;
begin
  InitializeRetrieveAccessTokenRequest(Self);
  ExecuteRequest({$IFDEF LCLWEBLIB}@{$ENDIF}DoRetrieveAccessToken);
end;

procedure InitializeRetrieveAccessTokenRequest(const ACloudBase: TTMSFNCCloudBase);
begin
  ACloudBase.Request.Clear;
  ACloudBase.Request.Name := 'RETRIEVE ACCESS TOKEN';
  ACloudBase.Request.Host := 'https://accounts.google.com';
  ACloudBase.Request.Path := '/o/oauth2/token';
  ACloudBase.Request.Query :=  'client_id=' + ACloudBase.Authentication.ClientID
  + '&client_secret=' + ACloudBase.Authentication.Secret
  + '&redirect_uri=' + ACloudBase.Authentication.CallBackURL
  + '&code=' + ACloudBase.Authentication.AuthenticationToken
  + '&grant_type=authorization_code';
  ACloudBase.Request.Method := rmPOST;
end;
In the access token request, youll notice that the secret, authentication token, and callback URL are required to identify your application request and make sure the service returns the correct access token. The request is executed and automatically handled by the core layer in TMS FNC Cloud Pack. There is no need to manually parse the access token, unless the service deviates from the default OAuth 2.0 authentication flow.
After retrieving the access token, the service core layer is automatically performing a test to validate the access token and grant access to service APIs. The test needs to be handled by your service implementation. For Google Drive, the test involves calling a simple tokeninfo API endpoint to validate the tokens, but for other services, it could be retrieving the account information, or testing a retrieval of files/folders.
procedure TTMSFNCCustomCloudGoogle.TestTokens(const ATestTokensRequestResultEvent: TTMSFNCCloudBaseRequestResultEvent = nil);
begin
  InitializeTestTokensRequest(Self);
  ExecuteRequest(ATestTokensRequestResultEvent);
end;

procedure InitializeTestTokensRequest(const ACloudBase: TTMSFNCCloudBase);
begin
  ACloudBase.Request.Clear;
  ACloudBase.Request.Name := 'TEST TOKENS';
  ACloudBase.Request.Host := 'https://www.googleapis.com';
  ACloudBase.Request.Path := '/oauth2/v1/tokeninfo';
  ACloudBase.Request.Query := 'access_token=' + ACloudBase.Authentication.AccessToken;
  ACloudBase.Request.Method := rmGET;
end;
After executing the test tokens request, the service returns a JSON response which is unique for each service. For Google Drive, this is checking if the returned JSON does not have an error tag.
function TTMSFNCCustomCloudGoogle.GetTestTokensResult(
  const ARequestResult: TTMSFNCCloudBaseRequestResult): Boolean;
begin
  Result := InitializeTestTokensResult(Self, ARequestResult)
end;

function InitializeTestTokensResult(const ACloudBase: TTMSFNCCloudBase; const ARequestResult: TTMSFNCCloudBaseRequestResult): Boolean;
var
  o: TJSONValue;
  s: string;
begin
  Result := False;
  s := ARequestResult.ResultString;
  if s <> '' then
  begin
    o := TTMSFNCUtils.ParseJSON(s);
    if Assigned(o) then
    begin
      Result := not Assigned(TTMSFNCUtils.GetJSONValue(o, 'error'));
      o.Free;
    end;
  end;
end;
The result is a Boolean (true/false). When the result is a true, the service is successfully authenticated, and the application can start accessing various APIs. Below is a sample that shows how to use the access token to retrieve the account drive space info.
procedure TTMSFNCCustomCloudGoogleDrive.GetAccountInfo;
begin
  Request.Clear;
  Request.Host := Service.BaseURL;
  Request.Path := FBasePath + '/about';
  Request.Query := 'access_token=' + Authentication.AccessToken;
  Request.Method := rmGET;
  Request.Name := 'GET SPACE USAGE';
  ExecuteRequest({$IFDEF LCLWEBLIB}@{$ENDIF}DoRequestGetSpaceUsage);
end;

procedure TTMSFNCCustomCloudGoogleDrive.DoRequestGetSpaceUsage(const ARequestResult: TTMSFNCCloudBaseRequestResult);
var
  o: TJSONValue;
begin
  if ARequestResult.ResultString <> '' then
  begin
    o := TTMSFNCUtils.ParseJSON(ARequestResult.ResultString);

    if Assigned(o) then
    begin
      try
        FInfo.UserName := TTMSFNCUtils.GetJSONProp(o, 'displayName');
        FInfo.Quota := TTMSFNCUtils.GetJSONDoubleValue(o, 'quotaBytesTotal');
        FInfo.QuotaUsed := TTMSFNCUtils.GetJSONDoubleValue(o, 'quotaBytesUsed');

      finally
        o.Free;
      end;
    end;
  end;

  DoGetSpaceUsage(FInfo, ARequestResult);
  DoGetCurrentAccount(FInfo, ARequestResult);
end;
Demo
Included in the release is a demo that allows you to test out each service individually in one easy and intuïtive overview. Click on the service of your choice and fill in your Application Client-ID, Secret and the appropriate Callback URL registered to your application. click on Authenticate and start exploring. The demo is available for FMX, VCL, WEB and LCL.
We want your feedback!
In this blog post, we already asked you for which service(s) you wish to see an implementation. We already received a lot of feedback, and want to thank you for this. This allows us to continue development in future updates of TMS FNC Cloud Pack. For those that didn't yet fill in the survey, please go to https://www.survio.com/survey/d/N4J9X1C8L4V7K1U7VWe want your feedback, so we can improve the TMS FNC Cloud Pack even more, so we want to ask you for a thorough testing on TMS FNC Cloud Pack and provide us with any feedback, comments, suggestions and issues you experience. This can be done via comments on this blog, or an email to support@tmssoftware.com
↧
Video: Developing a web application with Google Charts (2/3)
After having created the service to retrieve the statistical information from the database and prepare it for our web application, we can develop the web application.
We will, of course, use TMS Web Core to develop the web application quickly and efficently. As we use a web service that is created with XData we can rely on the XData controls that are offered for TMS Web Core to develop using the RAD principle.
In detail, you will learn how to:
- Create a new TMS Web Core application
- Use non-visual data components to connect to XData
- Use Google Maps component in a web application
↧
Video: Adding user-interaction with drill-down/detail content from a database to a Google Chart web application (3/3)
The video series has taught us how to build a custom web service to deliver data to the web application showing a Google Chart. Displaying information is wonderful, but the chart shows only aggregated values. Any user of the application will have the desire to drill down into the data and not just see the sums and averages.
That is why this video will show you how to add user-interaction and query the database to show specific information:
You will learn how to:
- Add interaction to your chart
- Add a pop-up window that displays drill-down information, also requested from the web service
- Specify XData Query operations
Here is a link to the video:
↧