Quantcast
Channel: TMS Software
Viewing all 1093 articles
Browse latest View live

CORS and preflighted requests with TMS XData

$
0
0

From Wikipedia: Cross-origin resource sharing (CORS) is a mechanism that enables many resources (e.g. fonts, JavaScript, etc.) on a web page to be requested from another domain outside the domain from which the resource originated. In other words, if you are trying to access entities in a TMS XData server from a web page (for example, using AJAX requests), this mechanism (CORS) will eventually get in action.

Enabling CORS in TMS XData is very simple. Actually a single line of code:

    XDataServerModule.AccessControlAllowOrigin := '*';

And it will handle most of what's needed, including preflighted requests. This post could end here if you are looking about how to deal with CORS in TMS XData. But let me use the opportunity to explain and illustrate how CORS works.

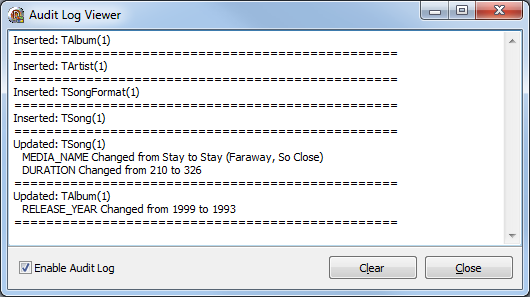
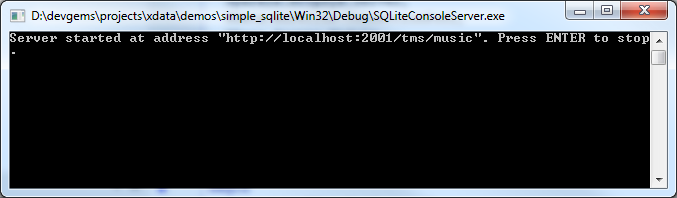
Let's use the SQLiteConsolerServer demo that is included in TMS XData distribution. This very simple demo creates an SQLite database in memory, fill it with some predefined data (artists, albums and tracks), and starts a XData server in the address "http://localhost:2001/tms/music" to provide the objects from the database. This is what you will get after running the demo.

Now if we go to our browser (I'm using Chrome here) and enter the URL "http://localhost:2001/tms/music/Track(1)", this is what we get:

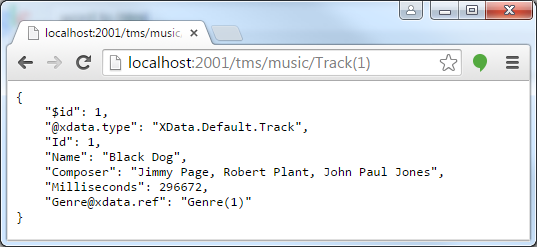
So far so good, our server is providing the JSON representation of our Track object with id equals to 1. But what happens if we try to do the same request using AJAX? Let's create a small HTML page with some JavaScript that performs the same GET request we're doing directly with the browser. Here is the full code of the HTML:


<!DOCTYPE html>
<html>
<body>

<script>
	function processResponse(xmlhttp) {
		switch(xmlhttp.status) {
			case 200:
				var track = JSON.parse(xmlhttp.responseText);
				document.getElementById("getButton").innerText=track.Name;
				break;
			case 404:
				document.getElementById("getButton").innerText="(not found)";
				break;
			default:
				document.getElementById("getButton").innerText="(invalid)";
		}
	}

	function getTrack1Name() { 
		var xmlhttp=new XMLHttpRequest(); 
		
		xmlhttp.onreadystatechange = function() {
			if (xmlhttp.readyState == 4) {
				processResponse(xmlhttp);
			}
		}
		xmlhttp.open("GET","http://localhost:2001/tms/music/Track(1)",true);
		xmlhttp.send(null); 
    }

	function deleteTrack1() { 
		var xmlhttp=new XMLHttpRequest(); 
		xmlhttp.open("DELETE","http://localhost:2001/tms/music/Track(1)",true) 
		xmlhttp.send(null); 
	}
</script>

<button onclick="getTrack1Name();" id="getButton">Get Track 1 Name</button> 
<br><br>
<button onclick="deleteTrack1();">Delete Track 1</button> 

</body>
</html>


Code is very simple, it just provides two buttons that perform GET and DELETE requests to get the name of Track 1 and delete Track 1, respectively.

Let's open that page in browser (I'm using a WAMP server here but you could just double-click the HTML file):

If we click the first button to retrieve the name of Track 1, we get this:

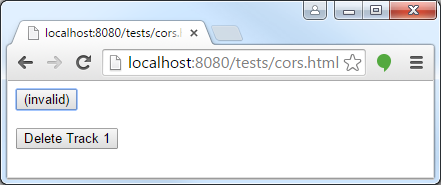
It doesn't work. Why is that? If we press F12 in Chrome to get more info about it, you can get a clue about what's going on:

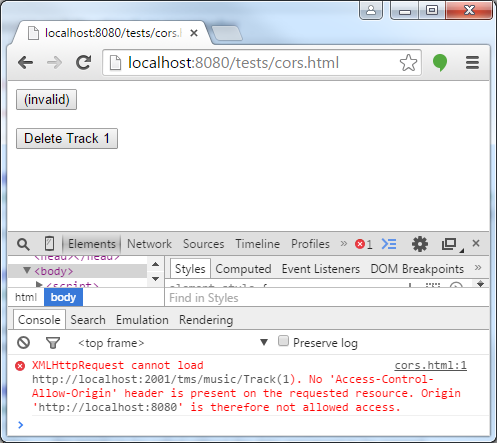
That's CORS in action. The browser doesn't allow a request from domain "localhost:8080" (where our web page is located) to the domain "localhost:2001" (where our XData server is located) unless our server states that it allows it (using the mentioned response header).

We can then modify our SQLiteConsoleServer demo to add that small line of code mentioned in the beginning of this post:

   {...}
    Module.AccessControlAllowOrigin := '*'; // Add this line
    Server.AddModule(Module);
    Server.Start;
    {...}

Then if we restart our server, refresh our test page, and try pressing the button again, here is what we get:

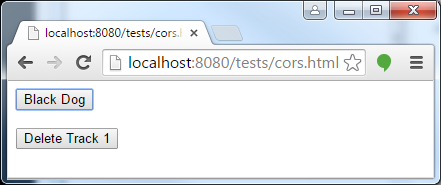
Now it works! Here is the response returned by the XData server:

HTTP/1.1 200 OK
Content-Length: 228
Content-Type: application/json
Server: Microsoft-HTTPAPI/2.0
access-control-allow-origin: *
Date: Fri, 10 Apr 2015 14:08:03 GMT

{
    "$id": 1,
    "@xdata.type": "XData.Default.Track",
    "Id": 1,
    "Name": "Black Dog",
    "Composer": "Jimmy Page, Robert Plant, John Paul Jones",
    "Milliseconds": 296672,
    "Genre@xdata.ref": "Genre(1)"
}

Note the presence of header "access-control-allow-origin" which states that the server allows requests from any server. You could just restrict this to a specific server origin address by simply defining the name of the server instead of using "*" when setting the property.

Now what about preflighted requests? It will happen when we click our "Delete Track 1" button. From this nice Mozilla web page explaining CORS, it explains that a request must be preflighted if the HTTP method is different than GET, HEAD or POST, or even if request use custom headers or content-type different than some accepted ones. This covers a lot of very common REST requests: DELETE, PUT, or POSTing JSON data.

So what happens exactly when we click "Delete Track 1" button? This is the request Chrome will send to our XData server:

OPTIONS http://localhost:2001/tms/music/Track(1) HTTP/1.1
Host: localhost:2001
Connection: keep-alive
Access-Control-Request-Method: DELETE
Origin: http://localhost:8080
User-Agent: Mozilla/5.0 (Windows NT 6.1; WOW64) AppleWebKit/537.36 (KHTML, like Gecko) Chrome/41.0.2272.118 Safari/537.36
Accept: */*
Referer: http://localhost:8080/tests/cors.html
Accept-Encoding: gzip, deflate, sdch
Accept-Language: en-US,en;q=0.8,pt;q=0.6

Note that instead of sending a DELETE request, it sent an OPTIONS request, which is the preflighted one. This means the browser is "checking" the server if the request he's going to perform is valid. It indicates it's going to perform a DELETE method using the "Access-Control-Request-Method" header. If the request had different headers, it would also send header "Access-Control-Request-Headers" to check with the server if the headers will be allowed.

The XData server then responds informing the client that the DELETE request will be accepted:

HTTP/1.1 200 OK
Server: Microsoft-HTTPAPI/2.0
access-control-allow-methods: GET,PUT,PATCH,DELETE,OPTIONS
access-control-allow-origin: *
access-control-max-age: 1728000
Date: Fri, 10 Apr 2015 14:16:15 GMT
Connection: close
Content-Length: 0

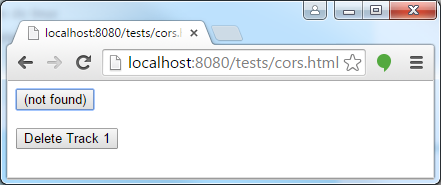
And finally, Chrome performs the actual DELETE request:

DELETE http://localhost:2001/tms/music/Track(1) HTTP/1.1
Host: localhost:2001
Connection: keep-alive
Origin: http://localhost:8080
User-Agent: Mozilla/5.0 (Windows NT 6.1; WOW64) AppleWebKit/537.36 (KHTML, like Gecko) Chrome/41.0.2272.118 Safari/537.36
Accept: */*
Referer: http://localhost:8080/tests/cors.html
Accept-Encoding: gzip, deflate, sdch
Accept-Language: en-US,en;q=0.8,pt;q=0.6

If we press the "Get Track 1 Name" button again, we will be informed it doesn't exist:

So, although enabling CORS in XData is just a single line of code, my intention here was to explain CORS with little more details, including preflighted requests, and show how XData makes it work under the hood.


Audit Log using TMS Aurelius events

$
0
0

The latest release of TMS Aurelius introduces an event system that allows you to subscribe listeners to some events that might be fired while you are using Aurelius, especially the TObjectManager.

One key difference between regular Delphi events and Aurelius events is that the latter are multicast events, meaning you can add listeners (handlers) to the events without worrying if you are replacing a listener that was already set to event. This way it's possible to create "plugins" to Aurelius that perform additional logic. For example you can easily add code that will be executed whenever an entity is inserted in the database:

TMappingExplorer.Default.Events.OnInserted.Subscribe(
  procedure(Args: TInsertedArgs)
  begin
    // Use Args.Entity to retrieve the inserted entity
  end
);

One very common use of that feature is implementing Audit Trail, a mechanism where you can log every entity (or database record, if you prefer to see it that way) that is created (inserted), deleted or modified (updated). The Music Library demo included in TMS Aurelius distribution was updated to include a simple Audit Log Viewer that illustrates how to use the events.

In the demo, the Audit Log Viewer just listen to the events and log them in a memo component in a form. You can enable/disable the logging. In real applications, you will just log the modifications to another place, like a text log file, or even the database itself, using Aurelius, if you prefer.


You can check the demo for the full source code. In this blog post, I will show only the relevant parts, for the OnInserted and OnUpdated events. Other parts of the code even inside procedures were removed for simplicity. Here is how we subscribe to the events:
  TfmAuditLogViewer = class(TForm)
  private
    FInsertedProc: TInsertedProc;
    FUpdatedProc: TUpdatedProc;
    procedure InsertedHandler(Args: TInsertedArgs);
    procedure UpdatedHandler(Args: TUpdatedArgs);
    procedure SubscribeListeners;
    procedure UnsubscribeListeners;
    {...}
  end;

constructor TfmAuditLogViewer.Create(AOwner: TComponent);
begin
  inherited;
  FInsertedProc := InsertedHandler;
  FUpdatedProc := UpdatedHandler;
end;

procedure TfmAuditLogViewer.SubscribeListeners;
var
  E: TManagerEvents;
begin
  E := TMappingExplorer.Default.Events;
  E.OnInserted.Subscribe(FInsertedProc);
  E.OnUpdated.Subscribe(FUpdatedProc);
end;


Note that we set the method reference in field variables so that we can later unsubscribe them if we want to:

procedure TfmAuditLogViewer.UnsubscribeListeners;
var
  E: TManagerEvents;
begin
  E := TMappingExplorer.Default.Events;
  E.OnInserted.Unsubscribe(FInsertedProc);
  E.OnUpdated.Unsubscribe(FUpdatedProc);
end;


And here is how we implemented our event listeners:

procedure TfmAuditLogViewer.InsertedHandler(Args: TInsertedArgs);
begin
  Log(Format('Inserted: %s', [EntityDesc(Args.Entity, Args.Manager)]));
  BreakLine;
end;

procedure TfmAuditLogViewer.UpdatedHandler(Args: TUpdatedArgs);
var
  Pair: TPair<string, Variant>;
  OldValue: Variant;
begin
  Log(Format('Updated: %s', [EntityDesc(Args.Entity, Args.Manager)]));
  for Pair in Args.NewColumnValues do
    if not (Args.OldColumnValues.TryGetValue(Pair.Key, OldValue) and (OldValue = Pair.Value)) then
      Log(Format('   %s Changed from %s to %s',
        [Pair.Key, TUtils.VariantToString(OldValue), TUtils.VariantToString(Pair.Value)]));
  BreakLine;
end;


Some different methods are called from those event handlers, but they are just helper methods. EntityDesc just retrieves a string representation of the entity being logged (class name and id), and Log and BreakLine just add text to the memo component:

function TfmAuditLogViewer.EntityDesc(Entity, Manager: TObject): string;
var
  IdValue: Variant;
  IdString: string;
begin
  IdValue :=  TObjectManager(Manager).Explorer.GetIdValue(Entity);
  IdString := TUtils.VariantToString(IdValue);
  Result := Format('%s(%s)', [Entity.ClassName, IdString]);
end;

procedure TfmAuditLogViewer.Log(const S: string);
begin
  Memo.Lines.Add(S);
end;

procedure TfmAuditLogViewer.BreakLine;
begin
  Memo.Lines.Add('================================================');
end;


After playing with Music Library demo for a while, adding and updating entities, we have our audit log results:


TMS coming to Delphi events near you

$
0
0

I'm honored to have been invited to two upcoming first-class Delphi events in Europe (United Kingdom and Germany) in May. I'm looking forward to meet again with so many fellow Delphi developers and discuss topics that excite us all software developers in a changing world. The focus in my session will as-always be on utilizing TMS components to bring to your applications a maximum set of features with a minimum effort, in this case, to FireMonkey cross-platform applications targetting Windows, Android, iOS and Mac OS-X.
What I'm most thrilled about though is the opportunity to let you see a first glimpse of a major new component for FireMonkey under development in our labs for quite some time now. The upcoming events in May will be the very first and only place for now for this sneak preview. Ok, to keep a kind of nostalgic atmosphere of mystery, I say no more here :)


May 6,2015: Spring Delphi Community Conference: National History Museum London, UK

With 20 years of Delphi development, the UK Delphi community comes together on this major event with key speakers Marco Cantu, Jason Vokes, Pawel Glowacki and Stephen Ball covering all the power our beloved language Delphi brings in XE8, MVC / MVVM, multitier development, deployment via Google Play, FireDac ...
Places are limited, so rush to register now for this free event!


May 11-12, 2015: Delphi Developer Days: Holiday Inn Express, Frankfurt am Main, Germany

There is no match in technical depth and amount of information transfer for the Delphi Developer Days. Going strong for years, Delphi Developer Days means 2 days diving deep into all the power Delphi brings for developers. On the menu is modern VCL programming techniques, utilizing the latest database access technologies with FireDac, cross-platform FireMonkey development, REST services, ... in both break-out sessions and sessions in one room. As there is so much information that even 2 days is little to grasp everything, you go home with an over 300 pages conference book to catch-up at home later. This year, Delphi Developer Days is brought by Delphi guru, book writer, consultant, speaker Cary Jensen and Ray Konopka: Embarcadero MVP, winner of the coveted Spirit of Delphi award, and owner and founder of Raize Software, one of the first providers of third-party Delphi components. Places are extremely limited! More information and registration can be found at: Delphi Developer Days


Introducing the upcoming TMS Planner for FireMonkey

$
0
0

We're thrilled to introduce to you the TMS Planner for FireMonkey, in short TTMSFMXPlanner that has been in development for many months and that is near to being released now.

While TMS Planner for FireMonkey design benefits from the significant experience the TMS team built-up with the award-winning VCL, IntraWeb and ASP.NET Planner components, the new component has been architected from the ground up for cross-platform, multi-device usage. This includes tuning for performance & footprint to run smoothly on Android or iOS smartphones and making the component flexible enough for complex scheduling applications in desktop or tablet applications.


In a nutshell, the TMS Planner for FireMonkey is a user-interface control representing a timeline and events for single or multiple resources.

Timeline
The timeline in the TTMSFMXPlanner is configurable. Default, it represents the standard 24hr timeline but this can be easily changed to month mode, a day period mode, a half-day period mode, multi-month mode or a custom timeline mode. With the custom timeline mode, the unit of time along the timeline can be fully programmatically set. In one of the included demos will be a timeline in seconds mode that represents a schedule of TV-adds.
Within the displayed timeline, the TTMSFMXPlanner has the notion of active and inactive time, typically used for open office hours that can be shown in a different collor as well as various ways to to display the actual time on screen. In addition, for period, month, multi-month modes, specific days of the week can also be set as inactive time.

Resources
The TTMSFMXPlanner can display events for a single resource or can deal with multiple resources. Multiple-resources can be displayed in different columns (when the timeline is vertical) or different rows (when the timeline is horizontal). But there is more. Views with multiple resources can be combined with multiple days. In this way, multiple resources per day and multiple days per resource can be shown. And in addition to this, there is also the flexible capability to create groups of a different nr. of resources or days, like grouping a number of days in a week or grouping a number of resources to a company etc...


Event Editing
Also for editing events in a TTMSFMXPlanner view, we went to great lengths to offer built-in easy to use and flexible to customize editing capabilities. First of all, changing the start time, end time or dragging the event to a different day or resource is optimized for both classic desktop mouse & keyboard interaction as touch based mobile device operation. Editing of event notes can be done via inplace editing or via a popup dialog. Both inplace editing and use of popup dialogs can be fully customized.


Cloud connectivity
If you want to hookup your TTMSFMXPlanner to a cloud calendar service, we have the adapters ready for you that let you interface the TTMSFMXPlanner to a Google calendar or Microsoft Live calendar. This is achieved by an adapter that interfaces the TTMSFMXPlanner via TTMSFMXPlannerGoogleAdapter or TTMSFMXPlannerLiveAdapter to TMS Cloud Pack components for access to these cloud calendar services.


Customization
We realize that scheduling applications all have different rules and particularities. Therefore, the TTMSFMXPlanner has overall extensive customization capabilities. From putting custom text in timeslots, defining event conflict handling, restricting events to resources, custom drawing over events, timeline, resource header, editing validation and much much more. And of course, the TMSFMXPlanner also visually automatically integrates with the selected FireMonkey application style.


All this and more is coming to you in the next major release of TMS Pack for FireMonkey. This new version will be free for all active registered users.

TMS Pack for FireMonkey v3.0: 3 new components: delivered

$
0
0

About 2 weeks ago we announced the upcoming new FireMonkey scheduling/planner component TTMSFMXPlanner here and revealed the first details about it. For quite some time, this was the number one requested component. Today we are excited to confirm its availability as part of TMS Pack for FireMonkey v3.0. So, we are happy to deliver on your requests. But there is more. Check here what TMS Pack for FireMonkey v3.0 brings:

TTMSFMXPlanner v1.0

Targetting Windows, Mac OS-X, iOS and Android devices, fine-tuned for desktop and mobile use and packed with features is our new scheduling/planner control TTMSFMXPlanner. It's suitable for a wide range of use-cases, from single resource day planning to multi-resource scenarios with fully customized timeline. In combination with TMS Cloud Pack for FireMonkey, it offers seamless connectivity to a cloud calendar like Google calendar or Microsoft Live calendar. Read more about TTMSFMXPlanner in this blog, the developers guide or check out the fully functional trial version.

TTMSFMXRatingGrid v1.0

Also new in TMS Pack for FireMonkey is this control for capturing ratings for different items, making questionaires or for presenting feature comparison lists. It supports customizable tickmarks, radiogroup or checkgroup behavior for items.

TTMSFMXPassLock v1.0

To protect the use of your applications or access to certain parts of your application, the TTMSFMXPassLock is a component for input of a configurable length pass code or pass pattern. One property controls in what mode the pass code can be entered and the component features a pass code learn mode as well. An event is triggered when the pass code is correct or wrong.

Other improvements

Other than these 3 new controls, there are several improvements to existing components as well. The full version history is here.

More good news

And to round up the good news, all customers with an active registration for TMS Pack for FireMonkey receive this v3.0 free. For customers with an expired registration, a renewal discount of about 50% is available for 30 days.

Call to action

Add your feature request or vote on existing feature requests. It is one of the tools that help us align our development efforts with your needs.

Weekend fun with Raspberry Pi 2 and TMS Cloud Pack

$
0
0

Thinking to myself, why go through the hassle of sacrificing a desktop computer or fiddle around with VMs to test something on a Linux machine when I have here several 85mmx56mm Raspberry Pi boards laying around capable of amazing things. For my experiments, I wanted to have an ownCloud available and first thing to do was getting an ownCloud up and running on the Raspberry Pi 2, which turned out to be a piece of cake. To do this, follow these instructions:

Step 1: getting Apache up and running

If Apache is already setup on your device, skip this step, otherwise, from the command line, execute:

$ sudo apt-get install apache2

The Raspberry Pi 2 LED flashes for a short while and when completed, verify it is working by opening a browser on a machine in the network and navigate to the IP address of the Raspberry Pi 2 like http://192.168.1.100. When install was successful, you'll be greeted with an "It works!" page.

Step 2: install PHP and tools

In case you had Apache already configured with PHP 5, you can also skip this step.
To install, execute following commands:

$ sudo apt-get install php5
$ sudo apt-get install php5-gd
$ sudo apt-get install sqlite
$ sudo apt-get install php5-sqlite
$ sudo apt-get install php5-curl

After some more LED flickering, these steps will also be executed and the Apache environment with PHP 5 is ready.

Step 3: install ownCloud

To install ownCloud, start by downloading the latest distribution. At this time, this is v8.0.3 and is downloaded with:

$ sudo wget https://download.owncloud.org/community/owncloud-8.0.3.tar.bz2

Next step is to unpack the ownCloud distribution and install it under Apache.

$ sudo mv owncloud-8.0.3.tar.bz2 /var/www
$ cd /var/www
$ sudo bunzip2 owncloud-8.0.3.tar.bz2
$ sudo tar xf owncloud-8.0.3.tar

Step 4: setting up ownCloud

To finalize, the data folder for ownCloud must be created and an admin account added.
The data folder is created with following steps:

$ sudo mkdir /var/www/owncloud/data
$ sudo chown www-data:www-data /var/www/owncloud/data
$ sudo chmod 750 /var/www/owncloud/data

At this time it is more convenient to continue the setup from a browser. Either start the graphical shell on the Raspberry Pi 2 or connect from a browser on an external machine and navigate to http://localhost/owncloud or from external machine http://192.168.1.100/owncloud/
The first screen that appears is to create an admin account, so add the credentials for an admin account on this page. With this account added, owncloud is up and running and ready for use.

Step 5: Connecting from Delphi to ownCloud

Now Delphi kicks in and with a little help from the TMS Cloud Pack, let's start using ownCloud from a Delphi app.

Start your IDE, make sure TMS Cloud Pack is installed and drop the component TAdvCalDAV on the form. Configure the TAdvCalDAV component to access your ownCloud. Verify the ownCloud primary CalDAV address by opening the calendar app within ownCloud via: http://192.168.1.100/owncloud/index.php/apps/calendar/ and in the bottom left corner, click on settings where this primary address is shown. By default, this should be:

http://192.168.1.100/owncloud/remote.php/caldav/

So, now we can configure the TAdvCalDAV component to connect to ownCloud on Raspberry Pi 2:

try
  AdvCalDav1.URL := 'http://192.168.1.100/owncloud/remote.php/caldav/';
  AdvCalDav1.Username := 'tms';
  AdvCalDav1.Password := 'tmsrocks!';
  AdvCalDav1.Active := true;
except
   Exit;
end;

After a successful connect, the calendars and their events available on ownCloud can be retrieved, here by filling the info in a listview:

var
  i: integer;
  cdi: TCalDavItem;
  li: TListItem;
begin
  // get events
  for i := 0 to AdvCalDav1.Items.Count - 1 do
  begin
    cdi := AdvCalDav1.Items[i];

    if cdi.vCalendar.vEvents.Count > 0 then
    begin
      li := ListView1.Items.Add;
      li.Caption := cdi.vCalendar.vEvents[0].Summary;
      li.SubItems.Add(FormatDateTime('dd/mm/yyyy hh:nn',cdi.vCalendar.vEvents[0].DTStart));
      li.SubItems.Add(FormatDateTime('dd/mm/yyyy hh:nn',cdi.vCalendar.vEvents[0].DTEnd));
      li.SubItems.Add(cdi.vCalendar.vEvents[0].Location);
      li.SubItems.Add(cdi.vCalendar.vEvents[0].Description.Text);
      li.Data := cdi;     
    end;
  end;
end;

Adding a new calendar item is equally easy:

var
  cdi: TCalDavItem;
  li: TListItem;
begin
  // set the calendar for the event
  cdi := AdvCalDav1.Items.Insert('Personal');  // add item to the "Personal" calendar
  cdi.vCalendar.vEvents.Add;
  cdi.vCalendar.vEvents[0].Summary := 'Schloss Dyck Classic Days';
  cdi.vCalendar.vEvents[0].Location := 'Jüchen, Deutschland';
  cdi.vCalendar.vEvents[0].Description.Text := 'Automobile Kulturgeschichte auf der Museums-Insel';
  cdi.vCalendar.vEvents[0].DTStart := EncodeDate(2015,7,31);
  cdi.vCalendar.vEvents[0].DTEnd := EncodeDate(2015,8;2);
  cdi.Post;
end;

or modifying an existing item

var
  cdi: TCalDavItem;
  li: TListItem;
begin
  cdi := ListView1.Selected.Data;
  cdi.vCalendar.vEvents[0].Summary := 'Schloss Dyck Classic Days 2015';
  cdi.Update;
end;

Similar to accessing the calendars of ownCloud, you can also access the contacts with the TAdvCardDAV component in a very similar way. And this rounded up my little weekend fun experiment. With so much ubiquitous computing power around and wonderful technology, aren't we living in very exciting times?

Querying objects in your REST server with XData

$
0
0

One of my favourite features of TMS XData is its powerful querying capabilities. With no extra line of code in your server, clients can choose how to retrieve the server objects, filter them, set an order, etc..
For example, you can perform a GET request to get Customer objects but filter only those which name is John:

http://server:2001/tms/xdata/Customer?$filter=Name eq 'John'

You can also filter by properties of associated objects, at any level. The next example gets all customers which associated country name is "USA":
http://server:2001/tms/xdata/Customer?$filter=Country/Name eq 'USA'

You can use order, top and skip to get paged results (get next 20 orders from 41st one):
http://server:2001/tms/xdata/Order?$orderby=Date&$top=20&$skip=40

And, of course, you can combine all those with parenthesis and relational operators to build really complex queries:
http://server:2001/tms/xdata/Customer?$filter=(Name eq 'John' or Name eq 'Jack') and Country/Name eq 'USA'

But the purpose of this post is to tell about the new built-in functions introduced in version 1.5. They increase flexibility of the queries even more. Functions that extract part of of a date/time property were added, so now you can for example filter invoices for year 2014:
http://server:2001/tms/xdata/Invoice?$filter=year(IssueDate) eq 2014

There are of course similar functions to extract Month, Day, Hour, Minute and Second.
String-related functions were also added. Upper and Lower were introduced:
http://server:2001/tms/xdata/Customer?$filter=lower(Name) eq 'paul'

You can also use length function to retrieve the length of a string in characters:
http://server:2001/tms/xdata/Customer?$filter=length(Name) eq 15

And Position and Substring functions can also be used to retrieve the position of a substring in a string (Position) or to retrieve part of a string (Substring). They would be the equivalent of Delphi functions Pos and Copy, respectively:
http://server:2001/tms/xdata/Customer?$filter=substring(CompanyName, 2, 4) eq 'oogl'
http://server:2001/tms/xdata/Customer?$filter=position('jr', Name) gt 0

And it's worth to remember that having TMS Aurelius working behind the scenes, all those queries will work the same way regardless of the database your are using at the server side, be it MS SQL Server, MySQL, Oracle, or any supported database you want. Best part is that it's not going to stop here, stay tuned for future releases that will bring even more querying features!

TMS hands-on training day

$
0
0

TMS software organizes a new training day on Tuesday November 24th in Kortrijk, Belgium. On this training day we will cover following 3 product areas to help you getting the maximum out of your applications with TMS components:

  • TMS VCL UI components for Windows application development.
  • TMS FireMonkey UI components for cross-platform FireMonkey application development.
  • TMS components to access cloud services from Windows and FireMonkey applications.

In tentative program

  • 09h00-09h30: Registration & coffee
  • 09h30-10h30: In depth with TMS VCL components pt 1
  • 10h30-10h45: Q&A
  • 10h45-11h15: Coffee break
  • 11h15-12h15: In depth with TMS VCL components pt 2
  • 12h15-12h30: Q&A
  • 12h30-13h30: Lunch
  • 13h30-14h30: In depth with TMS FireMonkey components pt 1
  • 14h30-14h45: Q&A
  • 14h45-15h15: Coffee break
  • 15h15-16h15: In depth with TMS FireMonkey components pt 2
  • 16h15-16h30: Q&A
  • 16h30-17h30: In depth with TMS Cloud components
  • 17h30-17h45: Q&A
Given the large number of components we have, we like to hear which topics are of most interest to you to fine-tune our program to your needs. Therefore you can vote on your favorite topics in the online registration form

We also suggest to bring your laptop if you want to follow the samples live or if you want one of our experts to have a look at your implementations. For a maximum interactivity, the number of seats will be limited to 20 persons.

Registrations until October 31st

The cost of the TMS training day is 75 EU + VAT. This includes a full day access to the sessions and coffee/drinks during this day. A hot meal is served for lunch.

Location

  • Kennedy Hotel, Pres. Kennedypark 1, B-8500 Kortrijk
  • Free parking
  • Nearby highway (E17) exit
  • Facilities for hotel rooms at the event are available for international attendees


Fixing the FMX TWebBrowser issue on iOS 9

$
0
0

Update: You now optionally add additional keys in the iOS9Fix_config.txt file

Linking against iOS 9 introduces the new Application Transport Security feature that enforces a secure network connection. This means that in a default RAD Studio 10 Seattle project, the default TWebBrowser but also our TTMSFMXWebBrowser, TTMSFMXWebGMaps,
TTMSFMXWebOSMaps components and the TMS Cloud Pack for FireMonkey cloud services can no longer make a connection to the web. A solution for this issue is to add the following key to the Info.plist file:

<key>NSAppTransportSecurity</key>
   <dict>
      <key>NSAllowsArbitraryLoads</key>
         <true/>
   </dict>

As the Info.plist is automatically generated based on the project options, there is no option to specify a boolean key in a dictionary. To make sure the Info.plist file contains the correct keys in order to link against iOS 9 we have created an iOS9Fix command line executable and a post-build command.

1) Copy the iOS9Fix.exe & iOS9Fix_config.txt files to the project directory.

2) Add the following post-build command to your project options.

call "$(PROJECTDIR)\iOS9Fix.exe" "$(OUTPUTPATH).info.plist"

If the above steps are executed correctly, your application should then be able to make a connection with one of the components mentioned in this blog post.

The solution with the above instructions can be downloaded at http://www.tmssoftware.net/public/iOS9Fix.zip

This was the month September at tmssoftware.com

$
0
0

Another busy month went by at tmssoftware.com and so much happened that it is good to quickly summarize everything new that was introduced.

TMS All-Access

We introduced the TMS All-Access subscription which is an easy no-nonsense subscription to simply ALL our products. ALL products means all products we offer now but also all new products we'll release in the year of the subscription. It gives you also access to betas, previews and of course our priority support services. So, with TMS All-Access, you never have to worry again if you will miss something or if you have to take budget in account for future products. TMS All-Access has you covered for VCL, FMX, .NET, IntraWeb and new frameworks we'll start to support in the coming months.

TMS Component Pack v8.0

A major update of our popular UI suite, featuring meanwhile over 400 components was released. Highlight of this new release is TAdvTreeView. TAdvTreeView is a high-performance & feature-rich, multi-column treeview that easily handles millions of nodes. TAdvTreeView can be used in virtual & normal modes. Other new components are TAdvMultiInputQueryDialog and TAdvScrollMenu and as always, there are numerous extensions to existing components in the suite.

TMS VCL Cloud Pack, TMS FMX Cloud Pack

The goal of our TMS Cloud products is to make consuming popular cloud services from your client applications as seamless as possible. Be it from Windows VCL apps, FMX cross platform apps, .NET Windows or web apps or IntraWeb web apps, with our cloud components, access to these cloud services is plug & play. In new versions of the cloud packs is now also support for Google Analytics, GMail, Google Sheets, Trello & Stripe payments.

TMS Hands-on training day

Our team also started the planning of a new focused hands-on training day on using our components. In a small group, we aim to give you as much as possible insights, tips & tricks in using our VCL, FMX, Cloud components. Number of attendees is kept small to have as much interaction as possible and have the ability to look at your specific questions. A few places are still available, so register quickly if you want to participate.

TMS Flexcel DLL

We're proud to have released a new product this month, which is TMS Flexcel DLL. With TMS Flexcel DLL, the power of the Flexcel library to natively handle .XLS, .XLSX files becomes available to any programming language for Windows that is able to use DLLs.

TMS Pack for FireMonkey v3.2

Also for TMS Pack for FireMonkey, we released a major update. Our flag-ship suite of FMX controls features grids, planner, rich-text/html editor, syntax highlighting memo and with this new release from now on also a powerful treeview control. This high-performance, editable, optionally multi-column treeview deals with millions of nodes in a regular or virtual way. Also new is a virtual keyboard for touchscreens on Windows and Mac OS X.

RAD Studio 10 Seattle support

Our entire product suite got support for RAD Studio 10 Seattle. All active registered users get free updates of our products with now included RAD Studio 10 Seattle support.

New developments

And if this was not enough, our team was meanwhile also busy with research on new developments on VCL, FMX components as well as new products in the area of cloud, node.js, embedded C++, IoT, mobile, remoting, replication and more... Watch this space for announcements soon.

TMS FMX Chart update with new virtual mode available

$
0
0

Where in earlier versions, the method for adding values to a chart was via multiple calls to TMSFMXChart.Series[x].AddSinglePoint(), the new virtual mode offers a faster solution that is more flexible and typically consumes less memory. This can of course make a welcome difference when creating applications for mobile devices.
To start using the new TMS FMX Chart virtual mode, two events need to be implemented:

TMSFMXChart.OnGetNumberOfPoints()
and
TMSFMXChart.OnGetPoint()

In the first event, OnGetNumberOfPoints(), that is triggered for each series in the chart, the number of desired data points can be returned via the ANumberOfPoints parameter.
In this sample event handler, the number of points is set to 10000 for each series in the chart:

procedure TForm1.TMSFMXChart1GetNumberOfPoints(Sender: TObject;
  ASerie: TTMSFMXChartSerie; var ANumberOfPoints: Integer);
begin
  ANumberOfPoints := 10000;
end;
The second event, OnGetPoint() is used to return the value for each point in the chart series. Here comes the flexibility that these values can be retrieved directly from another data structure (even a database). In this sample example, we assume the values are in a dynamic array of 10000 values and for the sake of this example filled with random floating point values. This is the code that initializes two dynamic arrays that have the data for 2 series:
var
  data_arr_1, data_arr_2: array of double;
begin
  SetLength(data_arr_1,10000);
  SetLength(data_arr_2,10000);
  for i := 0 to Length(data_arr) - 1 do
    begin
      data_arr_1[i] := random(100) / 33;
      data_arr_2[i] := random(200) / 25;
    end;
end;
and now the event handler that sets the values for the virtual chart:
procedure TForm1.TMSFMXChart1GetPoint(Sender: TObject;
  ASerie: TTMSFMXChartSerie; AIndex: Integer;
  var APoint: TTMSFMXChartPointVirtual);
begin
   case ASerie.Index of
   0: if AIndex < Length(data_arr_1) then  
          APoint.YValue  := data_arr_1[AIndex]
   1: if AIndex < Length(data_arr_2) then  
          APoint.YValue  := data_arr_2[AIndex]
   end;
end;
A final touch is to apply some settings that will let the Y-axis scale automatically adapt to the values in the series and define the number of visible points along the X-axis (in this case 100 points of 10000 simultaneously visible along the X-axis, other values are shown when the chart is horizontally scrolled). This is done with:
  TMSFMXChart1.Series[0].AutoYRange := arEnabled;
  TMSFMXChart1.Series[0].MaxX := 100;
  TMSFMXChart1.Series[1].AutoYRange := arEnabled;
  TMSFMXChart1.Series[1].MaxX := 100;


TMS makes accessing cloud services from Raspberry Pi a piece of cake

$
0
0

The world of IoT opens fascinating & innovative capabilities to steer & sense the physical world from small programmable devices like the Raspberry Pi. It becomes even more interesting when this can be connected to cloud services. Imagine a device that unlocks a door at times controlled by a Google Calendar, a device monitoring noise levels in a room and sending a push notification to a mobile phone when a level is exceeded, a device automatically controlling a step motor with data retrieved from a Google Sheet, a device that counts people passing a door and logging this data in a DropBox data file, ... and so much more...

All this is nowadays not only possible, but it is also cheap to make and easy to write software for with the Pascal programming language.
With respect to writing the software that connects embedded apps to all kinds of popular cloud services, the all new TMS LCL Cloud Pack offers numerous easy to use components that seamlessly interact with these cloud services. It offers access to all popular cloud storage services, social media, calendering services, push notification services and more... See full list here.

In our lab, we had fun making a sample app that shows the number of visitors on our website that is retrieved with the Google Analytics realtime data API on a quad 7 segment LED with only a few lines of code.

In order to get started writing cloud-connected apps for the Raspberry Pi, all you need to do is download & install Lazarus v1.5 on your Raspberry Pi and then download & install the TMS LCL Cloud Pack. After install, over 30 new components are available for you. Then register for an application key & secret at your favorite cloud service and use our new Access Token generator app for Windows & Mac OS-X we created especially for TMS LCL Cloud Pack and have it generate the access token and export the token to your Raspberry Pi. With this mechanism, your embedded app can connect to cloud services without requiring any user interaction on the device for authentication & authorization for using a service. Once this is done, you're ready to let the cloud service component of your choice start consuming or producing data for the cloud service.

Finally, note that with Lazarus and our TMS LCL Cloud Pack, you're not limited to Raspberry Pi only. You can develop the prototype of the Raspberry Pi app on a Windows, Mac OS-X, Linux machine or can make full apps for these operating systems as well.


We hope you'll have as much fun creating this brand new type of applications as we had developing TMS LCL Cloud Pack and we're thrilled to learn about what your innovative apps will be!

This was the month November and December at tmssoftware.com

$
0
0

Just like September, November & December were again very busy months here at tmssoftware.com. A small overview:

TMS Logging

In the beginning of this month we released TMS Logging v1.0.0.0, a new logging framework that makes use of log levels to output values/objects. We developed TMS Logging to have a cross-platform solution that is flexible, compact and offers informative logs with a minimum amount of log code. TMS Logging is available for XE7 update 1 or newer (due to using the newest Delphi language features extensively) releases and supports VCL Win32/Win64 apps and FMX Win32/Win64/Mac OS-X/iOS/Android apps.


TMS LCL Cloud Pack

Begin November, our TMS Cloud Studio has been extended with TMS LCL Cloud Pack v1.0.0.0 . TMS LCL Cloud Pack offers easy access from Windows, Raspberry Pi, Mac OS-X, Linux applications to cloud services like Amazon, Facebook, Flickr, FourSquare, Picasa, Google, LinkedIn, Twitter,Wunderground weather, YouTube, ... . It offers access to all popular cloud storage services like OneDrive, Box, DropBox, calendering services, push notification services and more...


Watch our twitter account or facebook page for announcements about new developments on LCL components soon!

TMS Hands-on training day

The second edition of the TMS hands-on training day end November was again very successful. It was not only interesting for the attendees, but also for our team! We could talk to our customers face to face, hear stories about their experiences with Delphi, and could see what fantastic applications were developed with TMS components. We also got interesting suggestions on new features and new components some of which already found their way into product releases and others we will definitely work on in 2016. After this successful edition, we can say with certainty we'll be planning more events on TMS tools next year!


myWebMachine

We also acquired myWebMachine.com, a small company focusing on offering zero-client solutions to control a personal computer.

myWebMachine offers great & innovative technology to access your PC literally from anywhere, anytime: a Windows PC can be remotely controlled from another Windows PC, Mac OS-X or Linux computer or from devices such as iPad, iPhone, Android tablet, Microsoft Surface, Smart TV without the need to install any software on the client machine. Using the standard installed browser is sufficient.

If you wish to try out myWebMachine yourself, a free fully functional trial version is available at http://www.mywebmachine.com


TMS iCL v2.8.0.0

Our set of native iOS controls was also extended and improved. There were new capabilities and improvements in TTMSFMXNativeUITableView and a new control was added: TTMSFMXNativeAVPlayerViewController. This new control surfaces the iOS capability to display streaming video content along with system-supplied playback controls. It supports wireless movie playback to AirPlay-enabled hardware such as Apple TV and also the new iOS 9 picture-in-picture view.

TMS Component Pack updates

Our flagship bundle of productivity feature-packed VCL controls for Windows application development got 4! updates in the past 2 months. Our team is day-in, day-out listening to your requests & feedback and added no less than 29 new features and numerous smaller improvements and fixes over the last 4 free updates. And yes, also documentation was extended and samples were improved. Check out the latest version of TMS Component Pack and stay tuned for more new capabilities to be added in upcoming versions.

TMS FMX Chart v1.5.0.0

And finally, this week we released a major update of our cross-platform chart component. In TMS Charts for FireMonkey v1.5.0.0 we've added ctBand support.


Knowledge base alert

We would also like to say a small word about our monthly Knowledge base alert we started with this year. From the positive feedback we received from several subscribers, and for which we want to thank you, we can conclude many of our users appreciated this technical knowledge base alert. We will keep gathering these useful articles about our products and provide them to you via our newsletter. You can always consult these tips at: http://www.tmssoftware.com/site/kbnewsletters.asp our via http://www.tmssoftware.com/site/tips.asp
If you are not yet subscribed, you can add your email address here.

Best wishes for a happy & prosperous New Year from the TMS team!

We can conclude we ended 2015 with some new exciting developments. We're already brainstorming on several things for 2016 and we look forward to be at your service in 2016!


Our little New-Year gift for Pascal developers

$
0
0

On this last day of the year, we'd like to introduce a first version of a little New Year's gift for you, Pascal developers. If you are, like us, excited about Internet of Things, embedded software development, DIY projects, controlling electronics from your code, ... we have for you a first version of our new free & open-source bundle of hardware access components for Raspberry Pi. You can download full source code from here

  
This is a first small step into making interfacing with all kinds of external electronic devices like sensors, displays, step motor, input devices etc... as easy as setting a few properties or calling a few methods of a class. If you would for example like to measure some analog voltage and display the result on a small LCD display, this becomes as simple as:
var
  v: integer;
  s: string;
begin
TMSLCLAdaDispl16x2.Init;
v := TMSLCLAdaADC12B.ReadChannel(0);
s := 'Value: ' + IntToStr(v) + 'V';
TMSLCLAdaDispl16x2.DrawText(s);
end;

At this moment we have components for following Raspberry Pi breakouts and more are coming...

Adafruit 4 digit 7 segment display


Adafruit monochrome 128X32 OLED graphic display


Adafruit 12bit DAC


Adafruit 12bit 4 channel ADC


Adafruit RGB 16x2 LCD + keypad


Adafruit barometric pressure/temperature sensor


We of course also welcome you to contribute to this open-source package. Contact us with your suggestions, feedback, contributions.

TMS hands-on training day in Meerbusch, near Dusseldorf, Germany

$
0
0

We're pleased to inform that TMS software organizes a new training day on Friday March 11th. Our entire team will be present at the TMS Day in NRW Germany. Get the in-depth information directly from the principal architects of TMS products!

Tentative program

Please also send in the specific topics you want to see covered on this training day so we can finalize this tentative program and fulfill your needs in the best possible way. We suggest to bring your laptop if you want to follow the samples live or if you want one of our experts to have a look at your code or application. For a maximum interactivity, the number of seats will be limited to 30 persons.

Registrations until February 15 - number of seats limited to 30 persons!

The cost of the TMS training day is only 75 EU + VAT. This includes a full day access to the sessions and coffee/drinks during this day. A hot meal is served for lunch. Also, a 20% discount will be offered for NEW licenses for all attendees!

Location

  • Gut Dyckhof, Am Dyckhof 3, 40667 Meerbusch-Büderich - NRW, Germany
  • Very close to exit Meerbusch of the A52 highway
  • Free parking
  • Facilities for hotel rooms at the event are available for international attendees


Introducing FNC and TTMSFNCChart

$
0
0

As we have been developing UI VCL framework components since 1995 and FireMonkey framework components since 2011, we have recently been doing extensive research on approaches to create visual UI components that would simultanously support the VCL framework and the FireMonkey framework. As a result of this research, we came to the conclusion that the approach for VCL and FMX can also be easily applied to LCL, the component framework that comes with Lazarus.

Doing so offers a number of advantages both for users of the components and the developers of the components. With respect to using the components, the user can seemingly exchange code between a VCL project and an FMX project as the interface and class name of the component is 100% identical. When porting from VCL to FMX or vice versa all code can be shared as-is. Just like you'd write the code in VCL Edit.Text := 'Hello world', you can in exactly the same way do this with a FireMonkey TEdit or LCL TEdit. As with the result of this approach, the UI components also become usable with the LCL framework in Lazarus, this means that writing Pascal based GUI apps with these components also becomes possible for additional operating systems supported by Lazarus/FPC, i.e. Linux and its variants like Raspbian. Also for the development of the components, there are a number of advantages. With a sufficiently abstract layer in place, the component developer can focus on the component UI look & feel and behavior rather than with the particuliarities of each underlying framework. Support and maintance for highly complex components means managing a single code base as opposed to maintaining 3 code bases. This leads to faster development and support and ultimately to more stable code accross 3 frameworks.

For the result achieved, we came up with the name FNC components, which stands for Framework Neutral Components. As a proof of concept, we have now released our first FNC component TTMSFNCChart that supports a mind boggling array of frameworks and operating systems: VCL Win32/Win64 from Windows XP to Windows 10, FMX Win32/Win64, MacOS-X, iOS, Android, LCL Win32/Win64, Mac OS-X, iOS, Android, numerous Linux variants including Raspbian. Oh, and there is an extra benefit, the component is not only usable from Delphi or FreePascal but also from C++Builder. The feature set of the TTMSFNCChart is more or less identical to our FMX chart that includes line,bar, XY-line, XY-scatter, area, stacked bar, stacked area, digital line, pie, spider and donut charts with highly customizable legends, X-axis, Y-axis etc...

You can see the TTMSFNCChart initialized with 100% identical code on a couple of operating systems:


var
  i,j: integer;
  rng: array[0..2] of integer;
const
  val: array[1..12] of integer = (15,23,10,5,3,14,33,11,8,19,9,22);
begin
  Caption := 'TMS FNC Chart Demo';

  TMSFNCChart1.Width := 600;
  TMSFNCChart1.Height := 500;

  TMSFNCChart1.BeginUpdate;

  TMSFNCChart1.Title.Text := 'TMS FNC Chart : sales/month';
  TMSFNCChart1.Title.Font.Name := 'Helvetica';
  TMSFNCChart1.Title.Font.Style := [TFontStyle.fsBold];
  TMSFNCChart1.Title.Font.Size := 14;
  TMSFNCChart1.Title.Font.Color := gcBlue;

  TMSFNCChart1.Series[0].ChartType := ctLine;
  TMSFNCChart1.Series[1].ChartType := ctArea;
  TMSFNCChart1.Series[2].ChartType := ctBar;

  for j := 0 to 2 do
  begin
    TMSFNCChart1.Series[j].Points.Clear;
    TMSFNCChart1.Series[j].AutoXRange := arCommon;
    TMSFNCChart1.Series[j].Mode := smStatistical;
    TMSFNCChart1.Series[j].XValues.Angle := -90;
    TMSFNCChart1.Series[j].XValues.Title.Text := 'Months';
    TMSFNCChart1.Series[j].YValues.Title.Text := 'Units';
  end;

  TMSFNCChart1.Legend.Font.Size := 14;
  TMSFNCChart1.Series[0].LegendText := 'Retail';
  TMSFNCChart1.Series[1].LegendText := 'Consumer';
  TMSFNCChart1.Series[2].LegendText := 'B2B';
  TMSFNCChart1.Series[0].Markers.Shape := msSquare;
  TMSFNCChart1.Series[2].Markers.Visible := false;

  rng[0] := 70;
  rng[1] := 10;
  rng[2] := 40;

  for i := 1 to 12 do
    for j := 0 to 2 do
    begin
      TMSFNCChart1.Series[j].AddPoint(rng[j]+val[i], FormatSettings.LongMonthNames[i]);
    end;

  TMSFNCChart1.EndUpdate;
end;
The only difference in the project are references to units. For VCL, the unit namespaces are VCL.TMSFNC*, for FMX it is FMX.TMSFNC* and for LCL it is LCLTMSFNC* (as sadly FreePascal doesn't support a dot in the unit names)

Below are a number of screenshots of the chart running in a myriad of operating systems with exactly the same code:


TTMSFNCChart on iOS with FMX framework


TTMSFNCChart on Mac OS-X with FMX framework


TTMSFNCChart on Raspbian with LCL framework


TTMSFNCChart on Ubuntu with LCL framework


TTMSFNCChart on Windows with VCL framework

With this first proof of concept product ready now, we are eager to learn about your interest in this type of components and what other UI components you want to see us developing for FNC. We are curious to see your results bringing Pascal code bases to an amazing and vast number of operating systems and devices.

Creating Excel files in Windows, OSX and Linux with .NET Core

$
0
0

Introduction

In FlexCel .NET 6.7.9, we introduced preview support for .NET Core

This is a preview FlexCel release since it is compiled against a preview version of .NET Core and shouldn't be used in production, but it can be fun to explore.

This FlexCel version is also limited, because .NET core doesn't have currently any graphics support ( see https://github.com/dotnet/corefx/issues/2020 ) and so we can't do anything that needs graphics manipulations or measuring fonts. This means no rendering of Excel files, no exporting to PDF or HTML, no autofitting columns or rows. At the moment we are releasing support for almost the full API for reading and writing xls and xlsx files and also the reporting engine. The only limitation I can think of in the API is the Autofit methods to autofit rows and columns, because those need a graphics library to measure the fonts used in the cells. But the rest, including the full recalculation engine is there and working.

Getting Started

The first thing to do is of course to install .NET Core in Windows, OSX or Linux.
Once you have installed it, the next step would be to create a simple console application and see if it works. This is done by typing the following commands:
dotnet new
dotnet restore
dotenet run
It should look something like this:


Note:At the time of this writing, if you run those steps in OSX, you will see an error as explained here. Probably by the time you read this it is already solved, but if you get an error, as a temporary workaround you should try restoring the 10.10 (Yosemite) framework:
dotnet new
dotnet restore --runtime osx.10.10-x64
dotenet run
And the result should look like this:


Installing FlexCel

Ok, the first step is done. If we had any luck, we got a working .NET app, and we didn't even write a single line of code. So now, what about using FlexCel to create an xlsx file?

.NET core is all about NuGet, and even the .NET framework itself will be distributed via NuGet. So you need to download the FlexCel NuGet package from either the tms registered users page if you have a valid FlexCel license, or a trial from the product page.

Once we have the FlexCel NuGet package, we need to put it in a NuGet server so it can be used.
You can find information in how to setup a private nuget server for your own packages here: http://docs.nuget.org/docs/creating-packages/hosting-your-own-nuget-feeds

For this example, we are going to use the simplest way: Sharing a Windows folder. So we will put the package in r: mscomponents, and share that folder as "tmscomponents"


And that is it. Once you have shared the folder, you should see it in the Windows Explorer and in OSX Finder.

Configuring the project to use FlexCel

For the next steps, we are going to be using Visual Studio Code, but it can be done just as easy with any text editor. We will also be working in OSX, even when it is exactly the same for Linux or Windows. It just doesn't make sense to repeat the same information three times.

So we go to FIle->Open, and open the folder we created in the "Getting Started" section. In the screenshots, it was ~/dotnetcore.
Then we will edit our NuGet.Config file, and add the "tmscomponents" feed we created in the "Installing FlexCel" section to host the FlexCel NuGet package.

We need to add this line:
<add key="api.tmssoftware.com" value="/Volumes/tmscomponents" />

to the "packageSources" section of our project.json:


Note: This step is a little different depending in the operating system you are using. In Windows, you would write "\tmscomponents" instead of "/Volumes/tmscomponents" and in Linux you would write the path to the folder where you mounted the windows shared folder. Also note that in OSX and Linux, you might have to mount the folder before using it. In OSX this means opening the folder with the Finder, and in Linux it might change depending in the distribution you are using: either doing a mount command or opening it with the file explorer.

Adding a reference to FlexCel

Now, we need to add a reference to the nuget package in our project. Note that different from normal .NET where we add references to assemblies, we now add references to nupkg files which contain the assembly inside.

We will be adding the line:
"flexcel-dnx": "6.7.9-rc1"
to the "dependencies" section of the file project.json in our working folder:

Then we go back to the terminal, and type "dotnet restore" in our working folder. As we are in OSX and we have the bug we mentioned before, we will actually do "dotnet restore --runtime osx.10.10-x64". As mentioned, very shortly after this blog is published this won't be necessary.

The result should look something like this:


Note: For this reference, we use 6.7.9-rc1 which is the FlexCel version at the time I am writing this. .NET core uses semantic versioning for the names of the packages, and so the "-rc1" part of this release means it is not a stable release yet.

Writing the app

All the pieces of the puzzle are now in place: The only thing remaining now is to write the actual application. We will create an xlsx file with an image in my hard disk, some text and a formula. To do so, open the file Program.cs and replace the code in this file with the following:
using System;
using FlexCel.XlsAdapter;
using FlexCel.Core;
using System.IO;

namespace ConsoleApplication
{
    public class Program
    {
        public static void Main(string[] args)
        {
            var xls = new XlsFile(1, TExcelFileFormat.v2016, true);
            xls.SetCellValue(10, 1, "What");
            xls.SetCellValue(10, 2, "a");
            xls.SetCellValue(10, 3, "wonderful");
            xls.SetCellValue(10, 4, "world");
            xls.SetCellValue(11, 1, new TFormula("=A10 &  " " & B10 & " " & C10 & " " & D10"));
            xls.AddImage(File.ReadAllBytes("/Users/adrian/Documents/cube2b256.png"), 
            TXlsImgType.Png, 
            new TImageProperties(new TClientAnchor(TFlxAnchorType.MoveAndResize, 2, 0, 2, 0, 9, 0, 4, 0), ""));
            
            xls.Save("test-flexcel.xlsx");
            Console.WriteLine("File has been written to folder: " + Directory.GetCurrentDirectory());
        }
    }
}

For this particular example, I used an image I have at /Users/adrian/Documents/cube2b256.png. If you are running the code of this tutorial, make sure to write the path to a png you have on your machine.

After writing the code, save it, go back to the terminal and type:
dotnet run
If there are no errors, then you can type
open test-flexcel.xlsx
And if you have Excel installed in the mac, you should be able to see the file we just created:


Appendix: (Trying to) Convert the app to a native C++ app

So we have managed to create an Excel file with FlexCel and .NET Core in some short simple steps. And we did it in OSX, and we could have done it in Linux too. This is all interesting, but it is not like we couldn't have done it before with Mono and/or Xamarin

One of the things that I was really wanting to evaluate when we adapted FlexCel code to run in .NET Core was two mysterious lines which appear if you write
dotnet compile --help

Usage: dotnet compile [arguments] [options]

Arguments:
    The project to compile, defaults to the current directory. Can be a path to a project.json or a project directory

Options:
  -h|--help                           Show help information
  -o|--output             Directory in which to place outputs
  -t|--temp-output        Directory in which to place temporary outputs
  -f|--framework           Compile a specific framework
  -c|--configuration   Configuration under which to build
  --no-host                           Set this to skip publishing a runtime host when building for CoreCLR
  -n|--native                         Compiles source to native machine code.
  -a|--arch                     The architecture for which to compile. x64 only currently supported.
  --ilcargs                     Command line arguments to be passed directly to ILCompiler.
  --ilcpath                     Path to the folder containing custom built ILCompiler.
  --ilcsdkpath                  Path to the folder containing ILCompiler application dependencies.
  --appdepsdkpath               Path to the folder containing ILCompiler application dependencies.
  --cpp                               Flag to do native compilation with C++ code generator.
  --cppcompilerflags           Additional flags to be passed to the native compiler.

Now, before continuing: the word "native" has been so abused that it has lost any meaning. Everything is native and nothing is. You can have native code which is using Reflection/RTTI all over the place and behaving like interpreted code. You can have interpreted code that is JITed AOT and runs like compiled code. And what about memory management? Are we using a Garbage Collector, manual allocation/deallocation of maybe reference counting?

But well, from what I understand this --native switch seems to be a port of .NET Native but running in desktop Win64 apps (and OSX and Linux). This does seem indeed very interesting.

The --cpp switch seems even more interesting. It converts your C# code to C++ code, and uses Visual C++ to compile it. The generated cpp file is stored inside the obj folder so you can see it, even if you can't do much with it as it is not "readable C++" but more like "IL written in C++" which only a C++ compiler can understand.

So my idea was to run the tests in "normal", "native" and "cpp" modes to see how they behave. We have thousands of tests here which we can use to measure the performance, and while not designed as benchmarks, those tests do a lot of I/O (reading and writing thousands of Excel files), they do a lot of calculations (when testing the calculation engine) and they allocate and free a lot of memory (when testing huge files). In addition, they are heavily multithreaded. So is it any different? 1.5x, 2x, or maybe 10x faster? Or maybe slower?

And the answer is.... we don't have an answer yet. I couldn't get either the --native or the --cpp switches to work with FlexCel, and I didn't try much since I understand this is a prerelease version of .NET Core. What I could get was a simple console app with a single Console.WriteLine sentence to work in both "Native" and "CPP". But not anything complex enough as to benchmark it.

Ok, this is kind of a downer to finish this post. After all the nice stuff already possible with .NET core, it doesn't seem fair to close the post with something that doesn't really work yet (or that I wasn't able to make it work). Maybe I should delete this whole section before pressing "publish"? . I actually thought about it, maybe write something when I can actually make it work, but at the end I decided to keep it. The truth is, this whole native stuff is very interesting and I am really looking forward to see it come to life. I think it is well worth mentioning even if it isn't ready yet.

Is this the way to treat a customer?

$
0
0

In March, 2014, Thomas Milo Sorensen bought a TMS Business Subscription license. He was using Delphi XE5, the latest version available, and got the six products included in the subscription: TMS Aurelius, TMS Scripter, TMS Data Modeler, TMS Diagram Studio, TMS Workflow Studio and TMS Query Studio.

Later in the same month of March, 2014, TMS Sparkle, a framework to create and connect to HTTP servers, was released. Delphi XE6 was also released, and all TMS Business products were updated to support it. Those new versions and the new product were available for Thomas to download and install.

In April, 2014, a new product released, TMS RemoteDB, would allow existing client/server applications to be modified, with minimum effort, to access the database in the cloud, using simple HTTP connections, without requiring any database client, running from any platform. Existing Aurelius applications, could access remote databases with no modification at all.

In August, 2014, another product: TMS XData, which users could use to create a REST/JSON server that was strongly integrated with Aurelius. Sending, receiving and querying entities through REST was possible with a few lines of code

In September, 2014, Embarcadero released Delphi XE7, and all products got new releases that supported the new version.

Delphi XE8 and Delphi 10 Seattle were both released in 2015 and supported by the products. Several important updates were made to all products. TMS Scripter, which only worked on Win32, got support for all platforms Delphi targets, including Android, iOS and Mac OS X. TMS workflow got a significant revamp, with features like new SQL and mail blocks, variable editors, script transitions, among others. TMS Aurelius included several features voted by users, like concurrency control, object refresh and multi-model design. Even the new released products like XData and Sparkle got significant improvements.

In total, there were 71 (seventy one) product releases since he bought his license. 119 (one hundred and nineteen) new features added, without counting bug fixes and other minor improvements.

In that period, all support e-mails sent were answered. Many of them within hours. Most of them in 1-3 days. Even on weekends, holidays and vacation periods. The majority of questions in the TMS web forums were answered in the same timeframe. No major bugs reported were left unfixed.

And now, in February, 2016, TMS Echo will be released. The new replication system that will allow Aurelius applications to work offline and distributed by sending and receiving data from local to remote databases with minimal configuration. And, as you might guess, Thomas will be able to download, install and use this first TMS Echo version, for free. It's the 10th product available in TMS Business Subscription, and it was "only" six two years ago.

This is a fictional story based on real events. Thomas Milo Sorensen is not the real name of the customer. That's the fictional part.

Introducing myCloudData.net from TMS: Pascal generated data consumed by Delphi

$
0
0

Recently, we opened the beta for our new myCloudData.net service. myCloudData.net is both a service and SDK to put structured data in the cloud. After a long time of experience with all kinds of cloud services (based on OAUTH/REST/JSON APIs), we were frustrated there was not really a fast, flexible, simple and easy to use service for storing data in a structured way in the cloud. And thus, many months ago, the idea was born to create a service ourselves. A service you can use directly from our servers as well as an SDK to make this service available on your own server(s) for public or internal-only use. To illustrate what myCloudData.net is about and what it can do for you, we decided to do a sample project, bringing several bits & pieces like Lego blocks together, including myCloudData.net, our cloud components, our Raspberry Pi hardware access library and our VCL chart component.


The project

The project idea is really simple: a Raspberry Pi runs a Pascal application that retrieves the temperature from a temperature/barometric sensor and displays it on a 128x32 OLED screen and simultanously logs the retrieved temperature & pressure plus timestamp in the cloud in a simple table on the myCloudData.net service. At the other side, a Delphi VCL application retrieves the logged temperatures and displays the temperature in a chart. The idea is simple and the project is mainly about illustrating how fast such typical application can be put together with the right Lego blocks.


Used TMS components

For this project, we use quite a few TMS products. Of course, first there is the myCloudData.net cloud storage. We use the TMS Cloud Pack for VCL to access data from myCloudData.net and we use TMS Advanced Charts to display the data graphically and a TMS TAdvStringGrid to show the values in a grid. On the Raspberry Pi, we use the TMS LCL HW Pack to read our temperature & barometric sensor extension and to drive the 128x32 OLED display. Also used is the TMS LCL Cloud Pack to put the captured data on myCloudData.net

Setup

The first thing to do is creating an account on myCloudData.net. Head over to http://myCloudData.net and in a few seconds you can create a new account. Then, using this account, create a myCloudData.net application and you'll receive an application key and secret. This key & secret is used to connect from a Delphi app to myCloudData.net and in order to get started, the metadata is created for our table that will hold the captured sensor data. After dropping the TAdvmyCloudData component on the form, the code to do this is:


  // specify where to persist the TAdvMyCloudData access token once it is obtained
  AdvMyCloudData1.PersistTokens.Location := plIniFile;
  AdvMyCloudData1.PersistTokens.Key := '.myclouddata.ini';
  AdvMyCloudData1.PersistTokens.Section := 'tokens';

  // initializing the application key & secret for TAdvMyCloudData and setting the callback URL used in the authentication/authorization phase
  AdvMyCloudData1.App.Key := MYCLOUDDATAKEY;
  AdvMyCloudData1.App.Secret := MYCLOUDDATASECRET;

  AdvMyCloudData1.App.CallBackPort := 8888;
  AdvMyCloudData1.App.CallBackURL := 'http://127.0.0.1:8888';

  // obtain an access token or start using an existing access token to communicate with the service
  AdvMyCloudData1.Connect;
The AdvMyCloudData1.Connect will either go through a first time authentication/authorization step when there is not yet an access token or perform an access token validity check when there was one persisted in the INI file in this case. When the access token does not pass the test, a new authentication/authorization step will happen.
When either of these steps is succesfull, the TAdvmyCloudData.OnConnected event is triggered. In this event, we create the table on the myCloudData.net service when it does not already exist and the metadata is set. The code to do this is:

procedure TForm1.AdvMyCloudData1Connected(Sender: TObject);
var
  table: TmyCloudDataTable;
begin
  table := AdvMyCloudData1.TableByName('WEATHER');

  // when the table does not exist, create it and define its meta data
  if not Assigned(table) then
  begin
    table := AdvMyCloudData1.CreateTable('WEATHER');
    // string field that holds the ID of the Raspberry Pi generating the temperature/air pressure. Allows for multiple devices to log data
    table.MetaData.Add('STATIONID', ftString, 50);
    // timestamp of the measured temperature/air pressure
    table.MetaData.Add('TIMESTAMP',ftDateTime);
    // temperature & air pressure values
    table.MetaData.Add('TEMP', ftFloat);
    table.MetaData.Add('PRESS', ftFloat);
    table.SetMetaData;
  end;
end;

Generate the data from the Raspberry Pi with FPC/Lazarus/TMS LCL Cloud Pack and TMS LCL HW Pack

First of all connect the Adafruit 128x32OLED and Adafruit temperature/barometric sensor on the I2C pins of the Raspberry Pi.


Drop a TTMSLCLAdaDispl128x32 and TTMSLCLAdaBarTemp component on the form and open these devices with the code:

begin
  // initializes 128x32 OLED screen
  displ.InitGPIO;
  // open it, clear the display and show the text 'Ready....'
  if displ.Open then
  begin
    displ.Clear;
    displ.DrawTextLarge(0,4,'Ready....');
    displ.Display;
  end;
  // open the communication with the temperature/barometric sensor
  sensor.Open;
end;

Then also initialize the TTMSLCLCloudmyCloudData component. This initialization and connecting to the service is identical to its VCL counterpart:

procedure TForm1.FormCreate(Sender: TObject);
begin
  TMSLCLCloudMyCloudData1.PersistTokens.Location := plIniFile;
  TMSLCLCloudMyCloudData1.PersistTokens.Key := './myclouddata.ini';
  TMSLCLCloudMyCloudData1.PersistTokens.Section := 'tokens';

  TMSLCLCloudMyCloudData1.App.Key := MYCLOUDDATAKEY;
  TMSLCLCloudMyCloudData1.App.Secret := MYCLOUDDATASECRET;

  TMSLCLCloudMyCloudData1.App.CallBackPort := 8888;
  TMSLCLCloudMyCloudData1.App.CallBackURL := 'http://127.0.0.1:8888';

  TMSLCLCloudMyCloudData1.Connect;
end;

When the connection is succesful, the TTMSLCLCloudmyCloudData.OnConnected event is triggered where a reference (of type TmyCloudDataTable) to the WEATHER table on the service is obtained:

procedure TForm1.TMSLCLCloudMyCloudData1Connected(Sender: TObject);
begin
  table := TMSLCLCloudMyCloudData1.TableByName('WEATHER');
end; 

The final step is to capture the sensor data and effectively store the measured values on the cloud service. This is done at regular intervals via a timer's OnTimer event:

procedure TForm1.Timer1Timer(Sender: TObject);
var
  t,p: single;
  s: string;
  dt: TDateTime;
  ent: TMyCloudDataEntity;
begin
  if sensor.Connected then
  begin
    // Alternatingly capture the temperature & air pressure from the sensor and display its value on the OLED screen
    if ShowTemp then
    begin
      t := sensor.GetTemperature;
      s := 'T:' + Format('%.2f',[t]) + ' C';
    end
    else
    begin
      p := sensor.GetPressure;
      s := 'P:' + Format('%.0f',[p]) + 'mBar';
      lastpress := p;
    end;

    displ.Clear;
    displ.DrawTextLarge(0,4,s);
    displ.Display;

    dt := Now;

    // when a pair of temperature & air pressure is captured, store it on the myCloudData.net service
    if ShowTemp then
    begin
      if Assigned(table) then
      begin
        ent := table.Entities.Add;
        ent.Value['STATIONID'] := 'Home';
        ent.Value['TIMESTAMP'] := dt;
        ent.Value['TEMP'] := t;
        ent.Value['PRESS'] := lastpress;
        ent.Insert;
      end;
    end;

    // toggle capture & display
    ShowTemp := not ShowTemp;
  end;
end;

The Windows Delphi VCL desktop app showing the graph of captured temperature values

With the Raspberry Pi code running to generate our sensor data on the myCloudData.net service, now we can write a simple VCL application (or FMX if you want to do the same on a mobile device or Mac OS-X) that shows a graph of the captured temperature.

There is a one-time setup of the TMS Advanced Charts to have one line-chart and define the X-axis, Y-axis, Legend and Title text:

begin
  AdvChartView1.Panes[0].Series.Clear;
  AdvChartView1.Panes[0].Series.Add;
  AdvChartView1.Panes[0].Series[0].ChartType := ctLine;
  AdvChartView1.Panes[0].Series[0].LegendText := 'Temperature °C';
  AdvChartView1.Panes[0].Title.Text := 'my Raspberry Pi Weather station';
  AdvChartView1.Panes[0].XAxis.Text := 'time (sec)';
  AdvChartView1.Panes[0].YAxis.Text := 'temp (°C)';
end;

There is the same one-time setup of the TAdvmyCloudData component:

procedure TForm1.FormCreate(Sender: TObject);
begin
  AdvMyCloudData1.PersistTokens.Location := plIniFile;
  AdvMyCloudData1.PersistTokens.Key := '.myclouddata.ini';
  AdvMyCloudData1.PersistTokens.Section := 'tokens';

  AdvMyCloudData1.App.Key := MYCLOUDDATAKEY;
  AdvMyCloudData1.App.Secret := MYCLOUDDATASECRET;

  AdvMyCloudData1.App.CallBackPort := 8888;
  AdvMyCloudData1.App.CallBackURL := 'http://127.0.0.1:8888';

  AdvMyCloudData1.Connect;
end;


Upon succesful connection, it's straightforward to retrieve all captured values and display this in a TMS TAdvStringGrid and TMS Advanded Chart with the code:

procedure TForm1.GetRecords;
var
  i,r: integer;
  dt: TDateTime;
  t,p: double;
begin 
  // retrieve entities via the TAdvmyCloudData table
  table.Query();

  // setup the needed nr. of rows in the grid
  AdvstringGrid1.RowCount := 1 + table.Entities.Count;

  // set the X-axis range of the chart
  AdvChartView1.Panes[0].Range.RangeFrom := 0;
  AdvChartView1.Panes[0].Range.RangeTo := table.Entities.Count;

  // fill both chart & grid
  AdvChartView1.BeginUpdate;

  for i := 0 to table.Entities.Count - 1 do
  begin
    r := i + 1;

    dt := table.Entities[i].Value['TIMESTAMP'];
    t := table.Entities[i].Value['TEMP'];
    p := table.Entities[i].Value['PRESS'];

    AdvStringGrid1.Cells[0,r] := formatDateTime('dd/mm/yyyy hh:nn:ss', dt);
    AdvStringGrid1.Floats[1,r] := t;
    AdvStringGrid1.Floats[2,r] := p;

    AdvChartView1.Panes[0].Series[0].AddSinglePoint(t,inttostr(i*5)+'s');
  end;

  AdvChartView1.EndUpdate;

  AdvStringgrid1.AutoSizeColumns(false);
end;

To have some meaningful data for this sample project, we measured the sensor temperature reaction speed. This is done by a forced temperature increase with a heating source and then remove the heating source. In this chart, we can see the temperature every 4 seconds. It's very nice to see a fast and asymptotic curve of the reaction to a heat source and a much slower but also asymptotic curve of the reaction to cooling off.


Summary

We wanted to show how easy and fast it has become to have in this case two different Pascal applications working on the same cloud data. In less than one hour, you can setup a structured data storage in the cloud, write a Pascal Raspberry Pi app that talks to sensors, OLED displays and cloud data and at the same time a Delphi Windows, Mac OS-X or mobile device app that visualizes the Raspberry Pi captured data. All this requires literally not much more than hooking up some TMS components like we built the fire and police station with Lego blocks a couple of decennia ago, proving once more we, Pascal developers, are blessed with having a fun job.

Automated exception logging to the cloud

$
0
0

Exceptions


The new 1.1 release of TMS Logging supports automated exception handling. All you need is a simple Boolean property set to true and your existing applications can benefit from this new feature that will automatically
log unhandled exceptions to one or more registered output handlers.

The following sample demonstrates how easy it is to add this new functionality to your application.
TMSLogger.ExceptionHandling := True;
TMSLogger.RegisterOutputHandlerClass(TTMSLoggerBrowserOutputHandler, [Self]);
TMSLogger.Outputs := AllOutputs;
We all know the following code generates a division by zero and we should at least add an if statement to our code, checking whether b > 0 before attempting to execute the division and
assigning the result to the c variable, but let's say this code is more complex and hidden somewhere in a lost unit inside your project.
procedure TForm1.Button1Click(Sender: TObject);
var
  a, b, c: Integer;
begin
  a := 10;
  b := 0;
  c := a div b;
end;
Clicking the button will generate an unhandled division by zero exception.


Because the TMSLogger has the ExceptionHandling property set to True, the exception will automatically be sent to our registered output handler(s).
In this sample, we have registered a browser output handler as seen in the screenshot below.


As only unhandled exceptions are handled by the logger, wrapping the code with a try except code block will not send an exception output to the output handlers, therefore we have exposed an Exception method that will allow you to further customize the message that is logged.
procedure TForm1.Button1Click(Sender: TObject);
var
  a, b, c: Integer;
begin
  try
    a := 10;
    b := 0;
    c := a div b;
  except on e: EDivByZero do
    TMSLogger.ExceptionFormat('{%s} occured in Button1Click() at line 35', [e.Message]);
  end;
end;

Cloud


Now where does the above exception handling fit into the cloud stor(y)(age)? The new TMS VCL Cloud Pack and TMS FMX Cloud Pack have 2 new cloud components available that can be used as an output handler for the logger.
The first one is the myCloudData storage service which is able to (as the name indicates) store data in the cloud. The second one is the Exceptionless logging and exception handling service. The TMS Logging distribution has 2 separate units
available that can be used to link to both services and automatically log messages / exceptions to those services. Registering an Exceptionless or myCloudData outputhandler is done in the same way as any other output handler.
The output handler requires an already authenticated service, as the output handler will not perform authentication on the connected cloud service, it will try to directly send log or exception messages.

Exceptionless

Depending on the chosen framework, you can either add FMX.TMSLoggingExceptionlessOutputHandler or VCL.TMSLoggingExceptionlessOutputHandler unit to the uses list.
The initialization code authenticates with the Exceptionless service and afterwards registers the output handler specifically designed for this cloud service.
The cloud service component is passed as a parameter to the output handler registration along with a project ID, created through the Exceptionless dashboard.
uses
  FMX.TMSLoggingExceptionlessOutputHandler;

procedure TForm1.Button1Click(Sender: TObject);
var
  a, b, c: Integer;
begin
  a := 10;
  b := 0;
  c := a div b;
end;

procedure TForm1.FormCreate(Sender: TObject);
var
  p: TExceptionlessProject;
begin
  TMSFMXCloudExceptionLess1.Username := 'MyUsername';
  TMSFMXCloudExceptionLess1.Password := 'MyPassword';
  TMSFMXCloudExceptionLess1.DoAuth;
  if TMSFMXCloudExceptionLess1.TestTokens then
  begin
    TMSFMXCloudExceptionLess1.GetProjects;
    p := TMSFMXCloudExceptionLess1.GetProjectByName('TMSCloudPack');
    if Assigned(p) then
    begin
      TMSLogger.ExceptionHandling := True;
      TMSLogger.RegisterOutputHandlerClass(TTMSLoggerExceptionlessOutputHandler, [TMSFMXCloudExceptionLess1, p.ID]);
    end;
  end;
end;


myCloudData


The same approach can be applied to the myCloudData cloud service component, as with the Exceptionless cloud service component. The initialization code is slightly different due to the authentication process. Instead of a project ID, an optional tablename can be chosen. In this sample, the registration is done when the myCloudData service is connected after authentication. The initialization code additionally connects the cloud service through a dataset to our TDBAdvGrid component to display the records. The field names are stored in the MetaData property under the TTMSLoggermyCloudDataOutputHandler instance, which is returned by the RegisterOutputHandlerClass function.
procedure TForm1.AdvmyCloudData1Connected(Sender: TObject);
begin
  TMSLogger.RegisterOutputHandlerClass(TTMSLoggermyCloudDataOutputHandler, [AdvmyCloudData1, 'MyTableName']);
  ds.Active := True;
  grd.AutoSizeColumns(True);
end;

procedure TForm1.Button1Click(Sender: TObject);
var
  obj: TMyObject;
begin
  obj := TMyObject.Create;
  obj.X := 'Hello World !';
  obj.Y := 123.456;
  TMSLogger.StartTimer;
  TMSLogger.LogSystemInformation;
  TMSLogger.WarningFormat('The value for property Y is {%.3f}', [obj.Y]);
  TMSLogger.Trace(obj);
  TMSLogger.StopTimer;
  TMSLogger.Debug('
  • Item 1
  • Item 2
  • Item 3
'); obj.Free; ds.Refresh; grd.AutoSizeColumns(True); end; procedure TForm1.Button2Click(Sender: TObject); begin AdvmyCloudData1.Connect; end; procedure TForm1.FormCreate(Sender: TObject); begin grd := TDBAdvGrid.Create(Self); grd.Parent := Self; grd.Left := 20; grd.Top := 50; grd.Width := Width; AdvmyCloudData1.App.Key := 'MyAppKey'; AdvmyCloudData1.App.Secret := 'MyAppSecret'; AdvmyCloudData1.PersistTokens.Location := plIniFile; AdvmyCloudData1.PersistTokens.Key := '.myclouddata.ini'; AdvmyCloudData1.PersistTokens.Section := 'tokens'; AdvmyCloudData1.App.CallBackPort := 8888; AdvmyCloudData1.App.CallBackURL := 'http://127.0.0.1:8888'; da := TCloudDataStoreAdapter.Create(Self); da.CloudDataStore := AdvmyCloudData1; ds := TCloudDataSet.Create(Self); ds.Adapter := da; ds.Active := False; d := TDataSource.Create(Self); d.DataSet := ds; grd.DataSource := d; TMSLogger.Outputs := [loTimeStamp, loProcessID, loThreadID, loMemoryUsage, loLogLevel, loName, loValue, loType]; end;


Viewing all 1093 articles
Browse latest View live


<script src="https://jsc.adskeeper.com/r/s/rssing.com.1596347.js" async> </script>